Master Cultured Stone Veneer Installation for Flawless Curb Appeal
How to Apply Stone Veneer for Lasting Curb Appeal
Applying stone veneer starts behind the stone. Make sure the wall is sound, and install the moisture barrier and flashing required for an exterior wall. Add metal lath and a scratch coat when the wall system calls for them. Then spread the specified mortar on the back of each stone, set the corners and field stones, and fill and finish the joints.
I'm Bill Hogan, owner of Hogan Roof, with over 20 years of roofing and siding experience in Nassau County, Suffolk County, and Queens. When applying stone veneer, I pay close attention to the wall's water protection as well as the finished look.
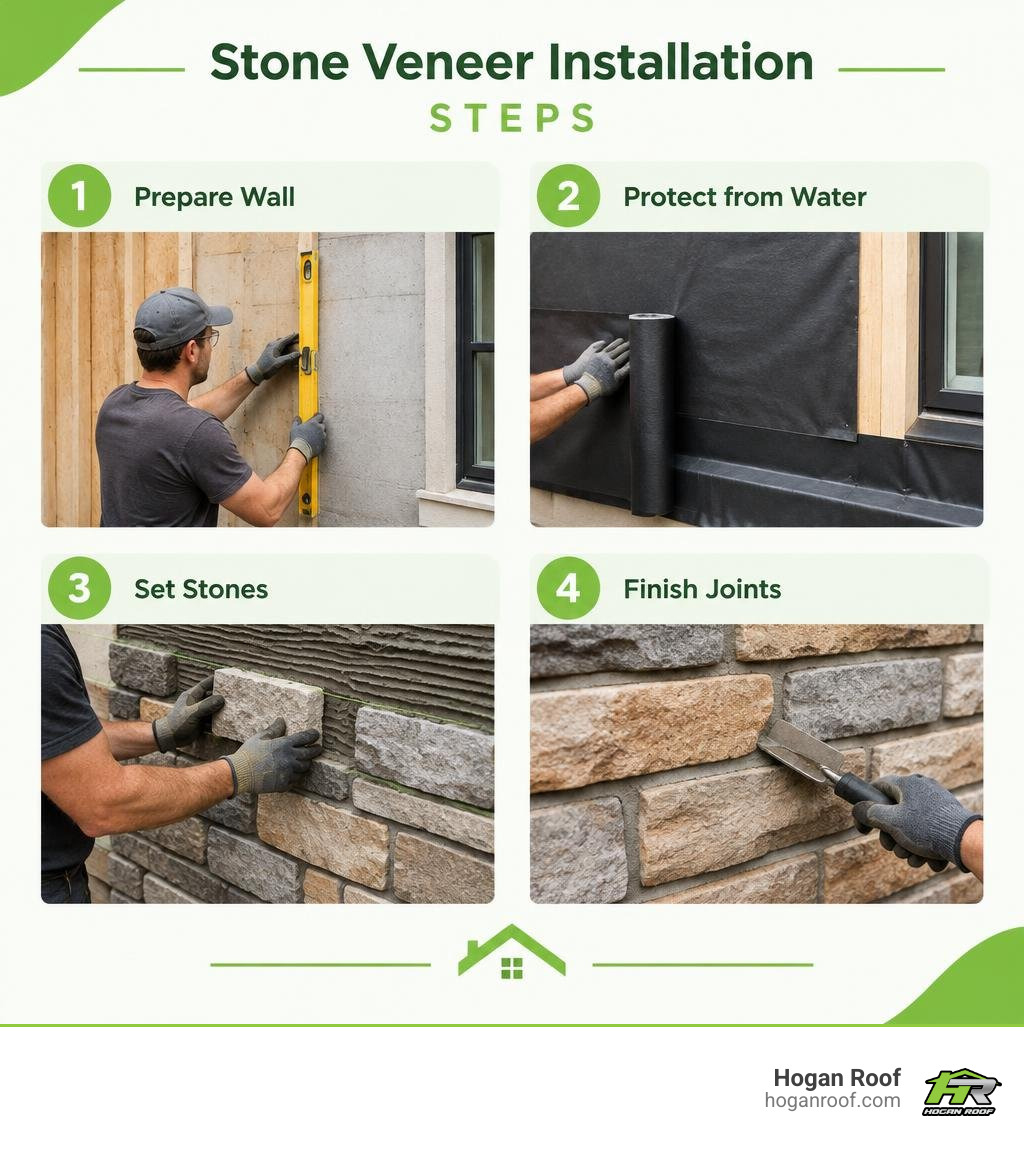
Whether you are remodeling an exterior façade or updating a living room fireplace, mastering these techniques ensures your masonry looks authentic and lasts for decades. Let's break down the process from calculating your materials to applying the final joint tooling.
Types of Stone Veneer and Material Estimation
Before lifting a trowel, you must choose the right profile and material for your project. Stone veneer generally falls into three main categories: natural thin stone, manufactured (cultured) stone, and faux polyurethane panels.
Natural thin stone veneer is cut from quarried rock down to a manageable thickness, offering authentic mineral textures and variations. Manufactured stone veneer is molded from lightweight concrete and iron oxide pigments, capturing the appearance of real geological formations at a fraction of the weight. High-density faux stone panels are molded from polyurethane; faux stone veneer is 75% lighter than real stone, making it an ultra-light option for quick interior upgrades.
When pairing stone accents with home cladding, explore the complete guide to upgrading your Long Island siding to choose profiles that complement each other seamlessly.
| Veneer Type | Composition | Average Weight | Best Application | Installation Method |
|---|---|---|---|---|
| Natural Thin Stone | 100% Quarried Stone | 10–14 lbs/sq. ft. | Exterior facades, premium fireplaces | Scratch coat & Type S mortar |
| Manufactured Stone | Portland cement & aggregate | 8–12 lbs/sq. ft. | Foundations, accent walls, siding accents | Scratch coat & polymer Type S mortar |
| Faux Stone Panels | High-density polyurethane | 2–4 lbs/sq. ft. | Interior DIY projects, light-duty accents | Direct mechanical fasteners & adhesive |
Calculating Stone and Mortar Quantities
Accurate material estimation prevents frustrating mid-project delays and shade batch mismatches. Calculate your wall requirements using this straightforward approach:
- Calculate Flat Square Footage: Measure the width and height of each wall area (Width × Height = Total Area in square feet). Subtract major openings such as windows, doors, and large fireboxes.
- Measure Linear Footage for Corners: Measure all outside vertical corners from top to bottom. Order corner pieces in linear feet.
- Deduct Corner Allowance from Flats: One linear foot of corner pieces typically covers roughly 0.75 to 1.0 square foot of flat wall area. Deduct the total linear feet of corners from your flat stone square footage to avoid ordering excess material.
- Account for Waste Factors: Add 3% for simple waste on straightforward walls with minimal cuts, and add 5% to 7% for areas requiring complex cuts around arches, gables, or electrical fixtures.
- Adjust for Joint Spacing: Most manufactured stone packaging assumes a standard 1/2-inch mortar joint. If you plan a tight-fitting "dry-stack" installation without exposed mortar joints, purchase an extra 10% to 15% in flat stone material.
- Estimate Mortar Needs: One 80-pound bag of pre-blended Type S mortar typically sets 10 to 12 square feet of stone, covering the scratch coat and bonding bed.
Choosing Between Adhered Masonry and Full-Depth Units
Adhered stone veneer relies on surface bonding rather than structural foundation ledges. Building codes (such as MSJC and IBC) restrict adhered masonry veneer to a maximum thickness of 2-5/8 inches deep (measured horizontally as installed) and a weight limit not exceeding 15 pounds per square foot.
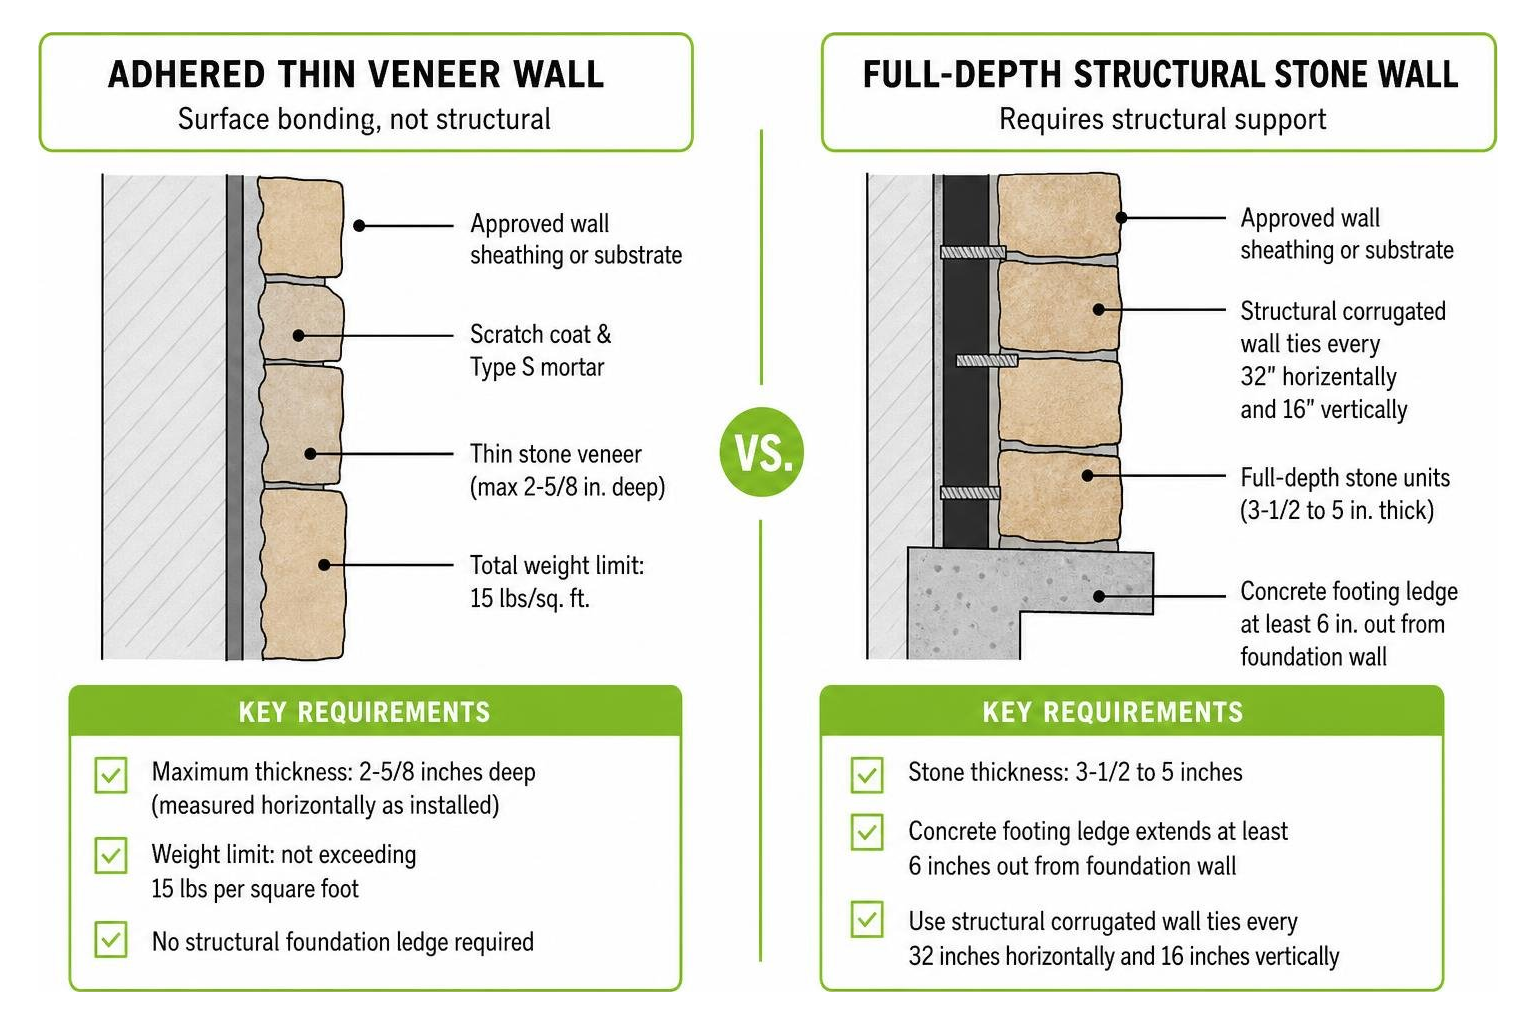
Full-depth stone masonry units measure 3-1/2 to 5 inches thick and require a concrete footing ledge extending at least 6 inches out from the foundation wall. When installing full-depth stone, follow the proper steps for preparing the foundation, incorporating structural corrugated wall ties every 32 inches horizontally and 16 inches vertically. For residential renovations where adding structural footings is cost-prohibitive, lightweight adhered veneer provides the same look without the engineering burden.
Substrate and Surface Preparation Standards
A durable stone installation depends entirely on the stability and moisture management of the substrate beneath it. Exterior wood-framed walls require a robust moisture-shedding envelope before any masonry goes up.
Exterior stone veneer must be installed at least 3 inches above grade level or 2 inches above paved hardscapes to prevent soil moisture, frost, and ground splash from degrading the mortar bed.
Installing Metal Lath and Weather Barriers
For exterior framed walls with OSB or plywood sheathing, follow these foundational preparation steps:
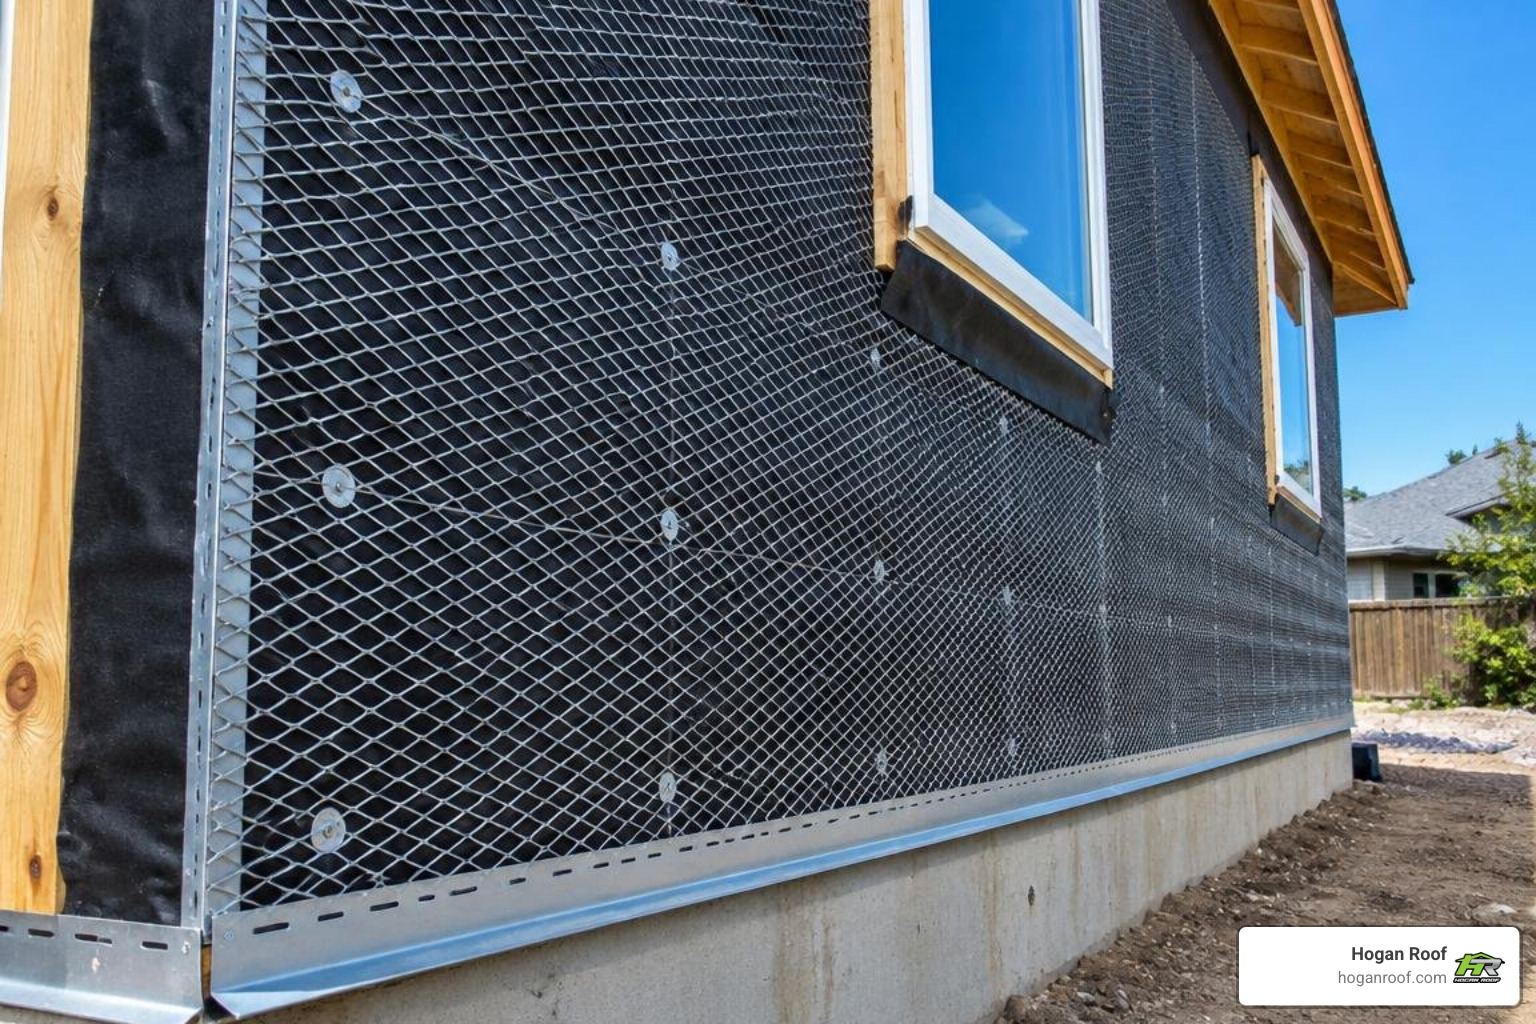
- Install the Weep Screed: Secure a corrosion-resistant galvanized weep screed along the bottom edge of the framing line, maintaining code-mandated clearance above grade.
- Apply Two Layers of Weather-Resistant Barrier (WRB): Layer two plies of Grade D asphalt-saturated building paper (ASTM D4869) or an approved drainage house wrap over the sheathing. Overlap horizontal seams by at least 2 inches and vertical seams by 6 inches, shingling the top layers over the bottom ones. Ensure the WRB overlaps the top attachment flange of the bottom weep screed.
- Hang the Metal Lath: Use 2.5 lb/yd² (or 3.4 lb/yd²) self-furring galvanized diamond wire lath. Hang the sheets horizontally with the rough "cupped" surface facing upward and outward—running your hand downward should feel smooth, while brushing upward feels rough.
- Fasten the Lath Securely: Overlap lath sheets a minimum of 1 inch on horizontal seams and 2 inches on vertical ends. Drive corrosion-resistant roofing nails or heavy-duty staples into studs every 6 inches on center vertically and 16 inches on center horizontally, penetrating the studs at least 1 inch. Wrap the wire lath continuously around inside and outside corners by at least 4 to 6 inches to eliminate corner cracking.
For a detailed walkthrough on wrapping substrates, review Step 1: Preparing the Surface.
Preparing and Applying Stone Veneer Scratch Coats
When metal lath is used, a scratch coat provides the rigid, bonded mortar foundation that supports the stone units.
- Mix the Scratch Coat: Combine Type S mortar with clean masonry sand at a 1:2.25 ratio, adding clean water until you reach a stiff, creamy peanut-butter consistency.
- Apply the Mortar Bed: Using a flat masonry trowel, firmly press the mortar through the mesh of the wire lath, embedding the metal completely. Build the coat to a uniform thickness of 1/2 inch to 3/4 inch.
- Score the Surface: While the mortar is still wet and pliable, use a notched trowel, scarifier, or medium-bristle brush to score horizontal grooves across the entire surface. These horizontal ridges provide mechanical keys that lock the setting mortar in place.
- Cure the Base: Allow the scratch coat to cure for 24 hours. Keep the wall lightly misted in hot or dry weather to prevent rapid shrinkage cracking.
(Note: Clean, unpainted concrete, poured foundation walls, or CMU block walls in good condition do not require wire lath or a scratch coat. Once power-washed, etched, and dampened, stone can be mortared directly to raw masonry substrates.)
Step-by-Step Guide to Applying Stone Veneer
Masonry installation requires mild environmental conditions. Always avoid stone installations in temperatures below 40° F (which stops mortar hydration) or above 90° F (which evaporates water too quickly and starves the chemical bond).
- Dry-Lay and Stage Your Stones: Lay out 20 to 30 square feet of stone flat on a tarp or clean plywood board. Mix pieces from multiple boxes to balance colors, heights, and textures naturally.
- Clean and Dampen the Units: Brush loose dust and factory fines off the back of each piece with a stiff brush. Lightly dampen the backs of porous stones and the cured scratch coat with a sponge or spray bottle. Dampening prevents dry masonry from sucking essential moisture out of your mortar.
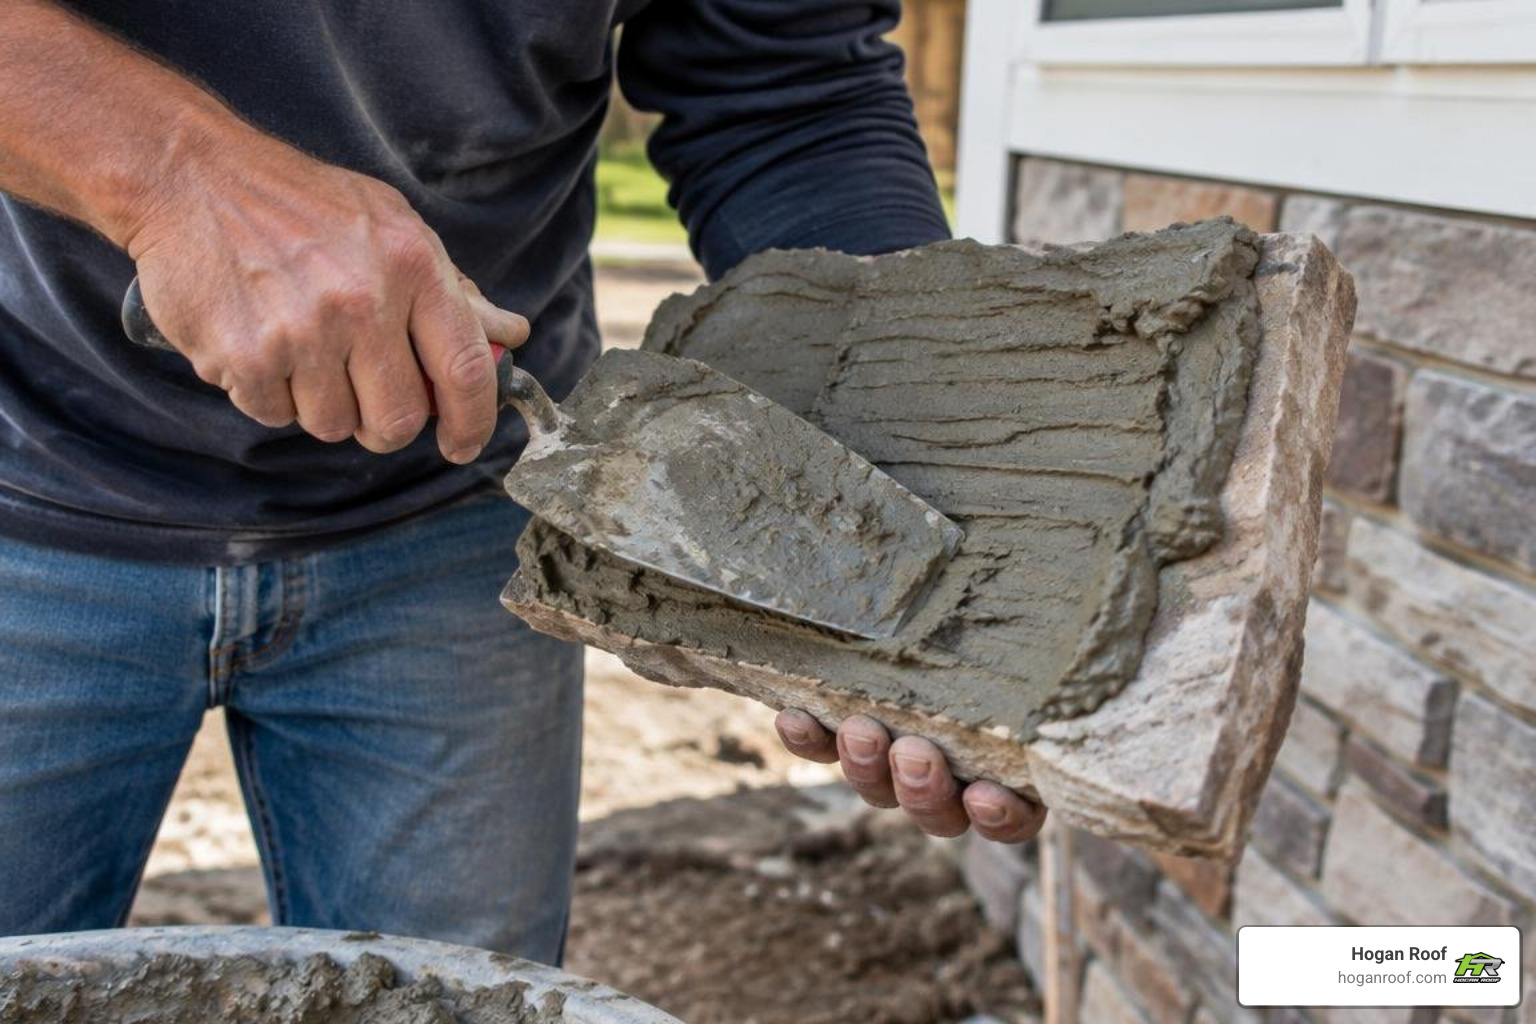
- Back-Butter Each Stone: Scoop a 1/2-inch to 3/4-inch layer of polymer-modified Type S mortar onto the reverse side of the stone. Use your trowel point to create a center depression or perimeter ridge.
- Press and Wiggle into Place: Press the stone against the wall with firm, steady pressure while wiggling it slightly back and forth. You should feel the mortar grab with suction, forcing a small amount of mortar to squeeze out around the edges.
- Check Plumb and Level: Use a torpedo level to ensure stones remain level along horizontal visual lines.
Essential Techniques for Applying Stone Veneer Around Corners and Edges
Always install your corner pieces before filling the field walls. Corner stones are manufactured with a long return leg and a short return leg.
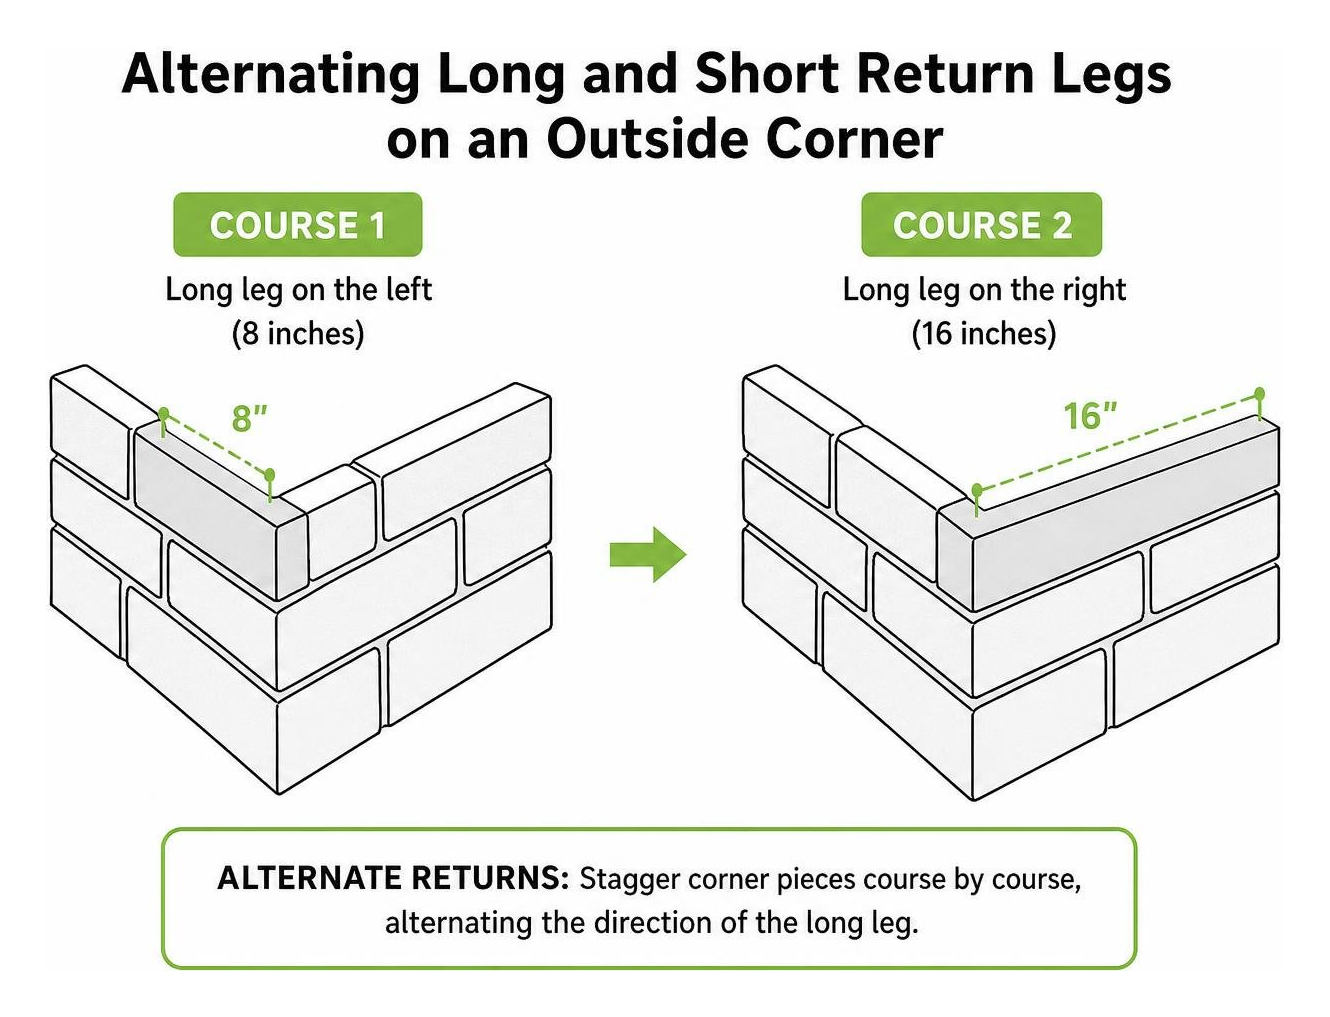
- Alternate Returns: Stagger corner pieces course by course, alternating the direction of the long leg (for example, 8 inches on the left, then 16 inches on the left). This prevents an artificial-looking vertical seam up the corner.
- Order of Installation: When applying stone veneer with mortared joints, working from the top down helps prevent wet mortar droppings from soiling finished lower courses. When installing dry-stack stone, working from the bottom up on a level ledger board provides physical support while the mortar sets.
- Cutting and Trimming: Use an angle grinder or circular saw fitted with a segmented diamond masonry blade for straight cuts. To create natural-looking rustic edges on trimmed pieces, nibble along the cut line with wide-jaw masonry nippers or strike the edge lightly with a brick hammer. Always wear an OSHA-compliant N95 or HEPA dust mask and safety glasses when dry-cutting masonry.
Grouting, Tooling, and Striking Mortar Joints
If your chosen profile incorporates standard mortar joints, grouting completes the weather seal and defines the wall's texture.
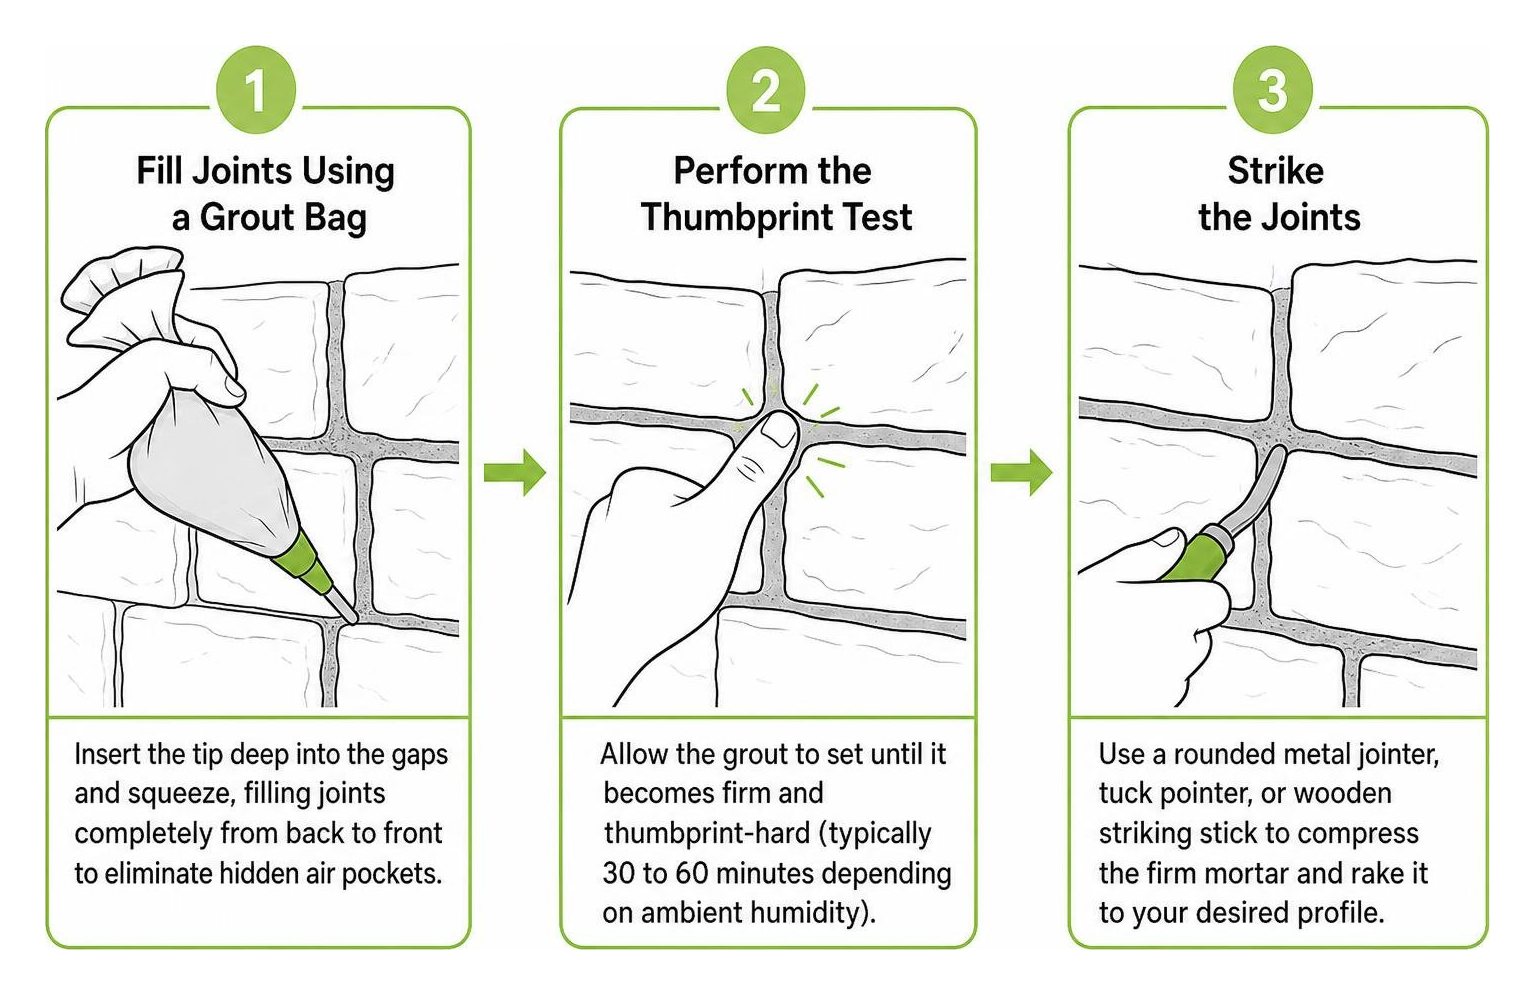
- Fill Joints Using a Grout Bag: Fill a heavy-duty masonry grout bag half full with smooth, creamy Type S mortar. Cut the plastic tip to match your joint width. Insert the tip deep into the gaps between stones and squeeze the bag, filling joints completely from back to front to eliminate hidden air pockets.
- Perform the Thumbprint Test: Allow the grout to set until it becomes firm and thumbprint-hard (typically 30 to 60 minutes depending on ambient humidity). If the mortar smears across the stone or sticks wet to your finger, it is too soft to tool.
- Strike the Joints: Use a rounded metal joint tool, tuck pointer, or wooden striking stick to compress the firm mortar into the joint, pressing it firmly against the stone edges. Rake the mortar back to your desired profile (flush, concave, or deep-raked).
- Clean with a Dry Stiff Brush: Once tooled, sweep a medium-to-stiff natural bristle whisk broom across the joints at a 45-degree angle to remove loose mortar crumbs.
- Handling Mortar Stains: Never wipe wet mortar off the face of a stone with a damp rag, as this smears cement binder deep into the stone pores, causing cloudy milky stains. Let accidental mortar drips dry completely until crumbly, then flick them away with a dry brush or wooden scraper.
Critical Differences: Exterior vs. Interior Installation
While the cosmetic application of the stone looks identical indoors and outdoors, moisture dynamics create completely different structural requirements.
Homeowners planning broader home improvements should evaluate how stone integrates with other claddings. Learn what homeowners should know before installing vinyl siding in Suffolk County to plan cohesive material transitions. For comprehensive technical specs on weather protection, review the Adhered Natural Stone Veneer Installation Guide.
Exterior Flashing, Weep Vents, and Moisture Control
Exterior masonry walls are water-shedding assemblies that rely on gravity and drainage to handle wind-driven rain:
- Through-Wall Flashing and Weep Vents: Wherever stone veneer sits on an exterior shelf or foundation wall transition, install corrosion-resistant through-wall flashing projecting 1/4 inch past the face. Weep vents should be installed in veneer masonry at a maximum of 24 inches on center horizontally above through-wall flashing to allow trapped moisture to escape freely.
- Control Joints: Masonry walls expand and contract with temperature swings. Control joint spacing for stone veneer should be approximately 20 to 25 feet maximum on unbroken exterior walls, as well as at transitions in wall heights and structural expansion points.
- Window and Door Terminations: Maintain a 3/8-inch expansion gap between stone edges and window or door trim, sealing the perimeter joint with backer rod and high-grade exterior elastomeric polyurethane sealant.
Interior Fireplace and Accent Wall Considerations
Interior installations on drywall or wood stud framing eliminate the need for exterior water barriers, but present unique heat and structural considerations:
- Substrate Requirements: For fireplace surrounds or accent walls, remove existing drywall and install 1/2-inch cement backer board (such as Durock or WonderBoard) directly to wall studs using approved cement board screws spaced 8 inches on center.
- Direct Bonding: Tape and mud all cement board seams with alkali-resistant fiberglass mesh tape and polymer-modified thin-set mortar. You can back-butter and apply stone veneer directly to clean cement backer board without installing wire lath or a scratch coat.
- Zero-Clearance Preps: For fireplace faces, check the manufacturer's clearances to combustible framing and use heat-rated polymer-fortified thin-set mortars that accommodate moderate thermal cycling.
Frequently Asked Questions About Applying Stone Veneer
Do you install stone veneer from the top down or bottom up?
For installations with grouted joints, professional masons prefer working from the top down. Installing the top courses first prevents dropped mortar from landing on and staining clean stones below. For tight-fitted dry-stack profiles without mortar joints, installing from the bottom up is standard practice, resting the lowest course on a level ledger board so gravity holds each row in alignment while the mortar sets.
How long does a scratch coat need to cure before applying stone veneer?
A standard Type S mortar scratch coat should cure for a minimum of 24 hours to develop sufficient compressive strength and suction. If working continuously on smaller projects, masons sometimes use a "wet joint" application within 1 to 2 hours of scoring the scratch coat while it remains firm but green. If the scratch coat has fully dried over several days, always dampen the surface lightly with water before setting stones.
What is the best mortar mix ratio for stone veneer installation?
The industry standard for setting adhered stone veneer is Type S mortar mixed with clean masonry sand at a 1:2.25 ratio by volume (or pre-packaged Type S polymer-modified veneer mortar). Polymer-fortified mortars offer higher bond strength and flexural durability, preventing stone detachment under environmental expansion.
Conclusion
Applying stone veneer transforms standard walls into architectural focal points with lasting curb appeal. Success relies on careful preparation: establishing unbroken moisture barriers, securing wire lath with proper fastener spacing, mastering mortar consistency, and finishing your joints with clean tooling techniques.
Whether you are matching a new stone water table with fresh siding or upgrading your entire exterior, our team at Hogan Roof delivers expert craftsmanship backed by over two decades of local exterior experience across Long Island, including Nassau County, Suffolk County, and Queens.
Contact our team today for a free consultation and estimate on our professional siding solutions and exterior renovations!