A Simple Guide to Repairing Loose or Dented Aluminum Siding
Essential Tools and Preparation for Fixing Aluminum Siding
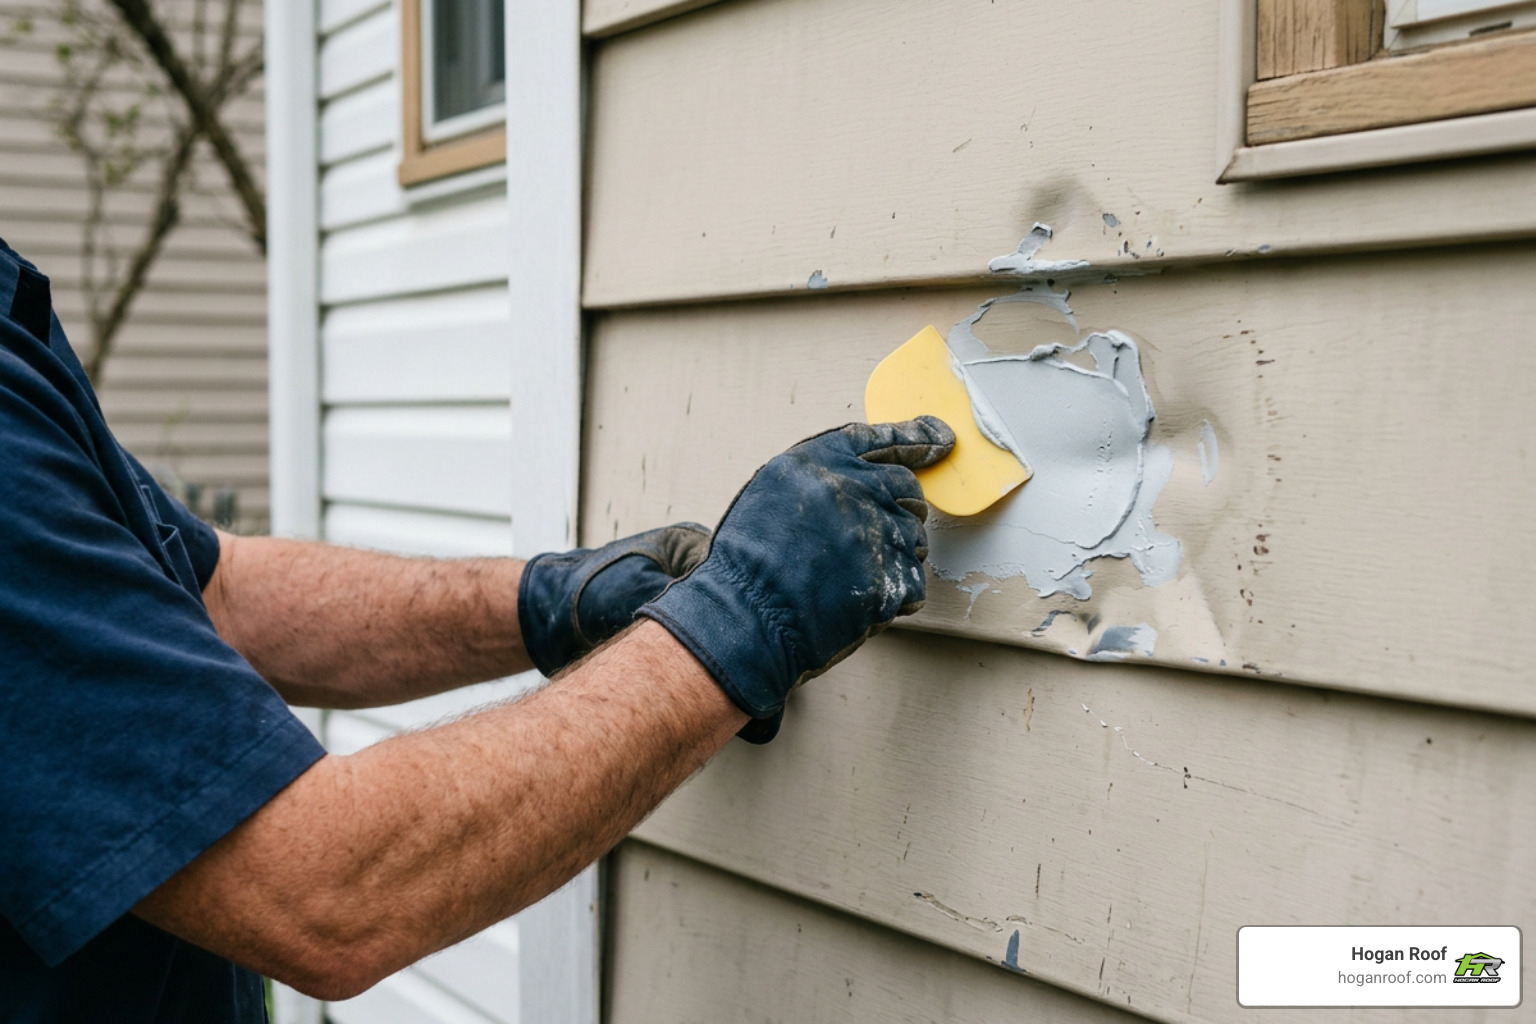
Fixing aluminum siding involves specific techniques based on the type of damage: re-engaging loose seams with a siding unlock (zip) tool, pulling shallow dents or leveling them with auto body filler, covering punctures with caulked aluminum overlay patches, or replacing severely damaged panels while leaving a 1/8-inch nail gap for thermal movement. Because aluminum is rigid and creases permanently when bent, careful handling and proper preparation are essential before starting repairs.
To fix loose, punctured, or dented metal cladding safely and effectively, assemble these essential tools:
- Siding Unlock Tool (Zip Tool): A thin metal tool with a hooked tip designed to slide into the bottom locking hem without bending the panel.
- Flat Pry Bar: An 12-to-18-inch flat bar used to reach behind panels and ease out fasteners.
- Tin Snips / Aviation Shears: Necessary for cleanly cutting aluminum patches and trimming replacement profiles without leaving jagged edges.
- Galvanized Roofing Nails (6d or 7d): Corrosion-resistant fasteners designed to hold panels securely into exterior studs or solid sheathing.
- Auto Body Filler (Bondo): A two-part polyester compound that bonds securely to bare metal to level out impact dents.
- Exterior Butyl Caulk & Clear Silicone: Flexible, weather-resistant sealants for securing patches and locking down loose joints.
- 220-Grit Sandpaper: For feathering filler repairs and prepping chalked metal surfaces for paint.
- Personal Protective Equipment: Heavy-duty work gloves to prevent razor-sharp metal cuts, alongside eye protection and a sturdy ladder.
Understanding the structural differences between siding materials will help you choose the right approach for your home. For a broader overview of material behaviors across different exterior systems, check out The Ultimate Siding Repair and Patching Guide | MyHomePros.
| Feature / Repair Factor | Aluminum Siding | Vinyl Siding |
|---|---|---|
| Material Flexibility | Rigid; bends and creases permanently under pressure | Highly flexible; bends and snaps back into place |
| Common Damage Types | Dents from hail/balls, punctures, chalking paint | Cracking, shattering in freezing temperatures |
| Fastening Gap Required | 1/8-inch gap under nail head for thermal expansion | 1/32-inch gap under nail head for movement |
| Dent Repair Method | Auto body filler or mechanical screw-pull method | Not repairable; requires section or panel swap |
| Patching Adhesion | High-grade butyl caulk or metal rivets | Vinyl cement or structural exterior adhesive |
| DIY Difficulty | Moderate (requires careful handling to avoid bends) | Low-to-Moderate |
Identifying Profiles: Shiplap vs Dutch Lap
Before buying replacement metal, you must determine the profile of your siding. Most homes built or renovated during peak aluminum installations feature either Double Shiplap (often referred to as standard horizontal lap) or Dutch Lap panels, typically with an 8-inch exposed reveal.

To identify your home's profile quickly:
- Place a straight edge or a builder’s level vertically across the face of a siding plank.
- Observe where the light shows through between the tool and the wall.
- If the profile drops flat down toward the bottom edge with significant light passing beneath the tool across a gradual angle, you have a shiplap profile.
- If the panel features a distinct concave, decorative bevel along the top half that cuts inward toward the wall with minimal light gap at the flat lower face, you have Dutch lap .
Because many manufacturers have discontinued specific older metal runs, measuring your plank thickness and reveal height is critical. If you are uncertain, carefully remove a small, damaged sample piece and take it directly to a local building materials distributor to verify the profile.
Color Matching and Texture Considerations
One of the biggest hurdles with older aluminum siding is matching paint color and surface texture. Over decades of sun exposure, original factory coatings oxidize, leaving a powdery chalk residue on the surface. If you slap factory-fresh paint onto one section, it will stand out immediately against the sun-bleached wall.
To achieve a seamless visual blend:
- Use the Donor Panel Method: If you must replace a damaged panel on a highly visible front wall, harvest an intact, weathered panel from an inconspicuous area of your home—such as behind a downspout, under a low deck overhang, or behind an air conditioning unit. Install the weathered original on the front wall and place your brand-new replacement piece in the hidden spot.
- Prep Chalked Surfaces Thoroughly: Wash away all chalking and oxidation using mild detergent and water before painting.
- Apply 100% Acrylic Latex: Once cleaned and primed with an appropriate metal primer, use a high-grade exterior acrylic latex paint. Acrylic forms a durable, flexible bond that contracts and expands with the metal through changing seasons.
- Account for Texture Limitations: Smooth aluminum is easy to fill and sand, but replicating embossed wood-grain metal with patching compounds is nearly impossible. For heavily textured metal with widespread damage, full panel swaps yield far cleaner visual results than spot filler.
Step-by-Step Guide to Restoring Damaged Siding Panels
Fixing compromised siding promptly protects the structural integrity of your home. Small cracks, loose seams, and puncture holes allow driving rain to slip behind the metal, where it slowly degrades the underlying house wrap, rots exterior wood sheathing, and invites mold. For fast-turnaround jobs on minor defects, follow the strategies outlined in How to Repair Aluminum Siding in Less Than an Hour.
Fixing Aluminum Siding Dents, Scratches, and Punctures
Baseballs, flying lawnmower gravel, and hail storms frequently leave dents in metal siding. Depending on how deep the damage goes, you can pull the metal back out or smooth over the void with professional fillers.
Method 1: The Screw-Pull Technique (For Deep Dents)
- Drill a very small pilot hole directly into the center of the deepest point of the dent.
- Drive a coarse-threaded sheet metal screw halfway into the hole.
- Grip the head of the screw with a pair of pliers and pull outward with firm, even pressure until the dent pops back close to its original plane.
- Back the screw out completely.
- Scuff the indented area and surrounding metal with 220-grit sandpaper to remove loose paint.
- Mix a small batch of two-part auto body filler and press it firmly into the depression with a plastic putty knife, slightly overfilling the low spot.
- Allow the compound to cure completely (typically 20 to 30 minutes), sand it flush with 220-grit sandpaper, apply an exterior metal primer, and finish with matching topcoat paint.
Method 2: Overlay Patching (For Holes and Punctures)
- Use tin snips to gently cut away torn, jagged edges around the puncture hole, pushing the perimeter slightly inward.
- Cut a patch piece from spare siding or sheet aluminum that is roughly 4 inches longer and wider than the damaged area (giving you a 2-inch overlap all around).
- Trim away the nailing hem and bottom interlock from the patch so it sits completely flat against the wall.
- Apply a continuous bead of exterior butyl caulk around the back perimeter of your patch.
- Firmly press the patch over the puncture, tape it with painters tape while the adhesive cures, and paint the edges to blend the patch with the wall.
Reattaching Loose, Unhooked, or Bowed Panels
Strong windstorms often catch the bottom lip of an aluminum siding panel, pulling it free from the course below it. When this happens, the panel bows outward, leaving your home exposed to moisture intrusion.
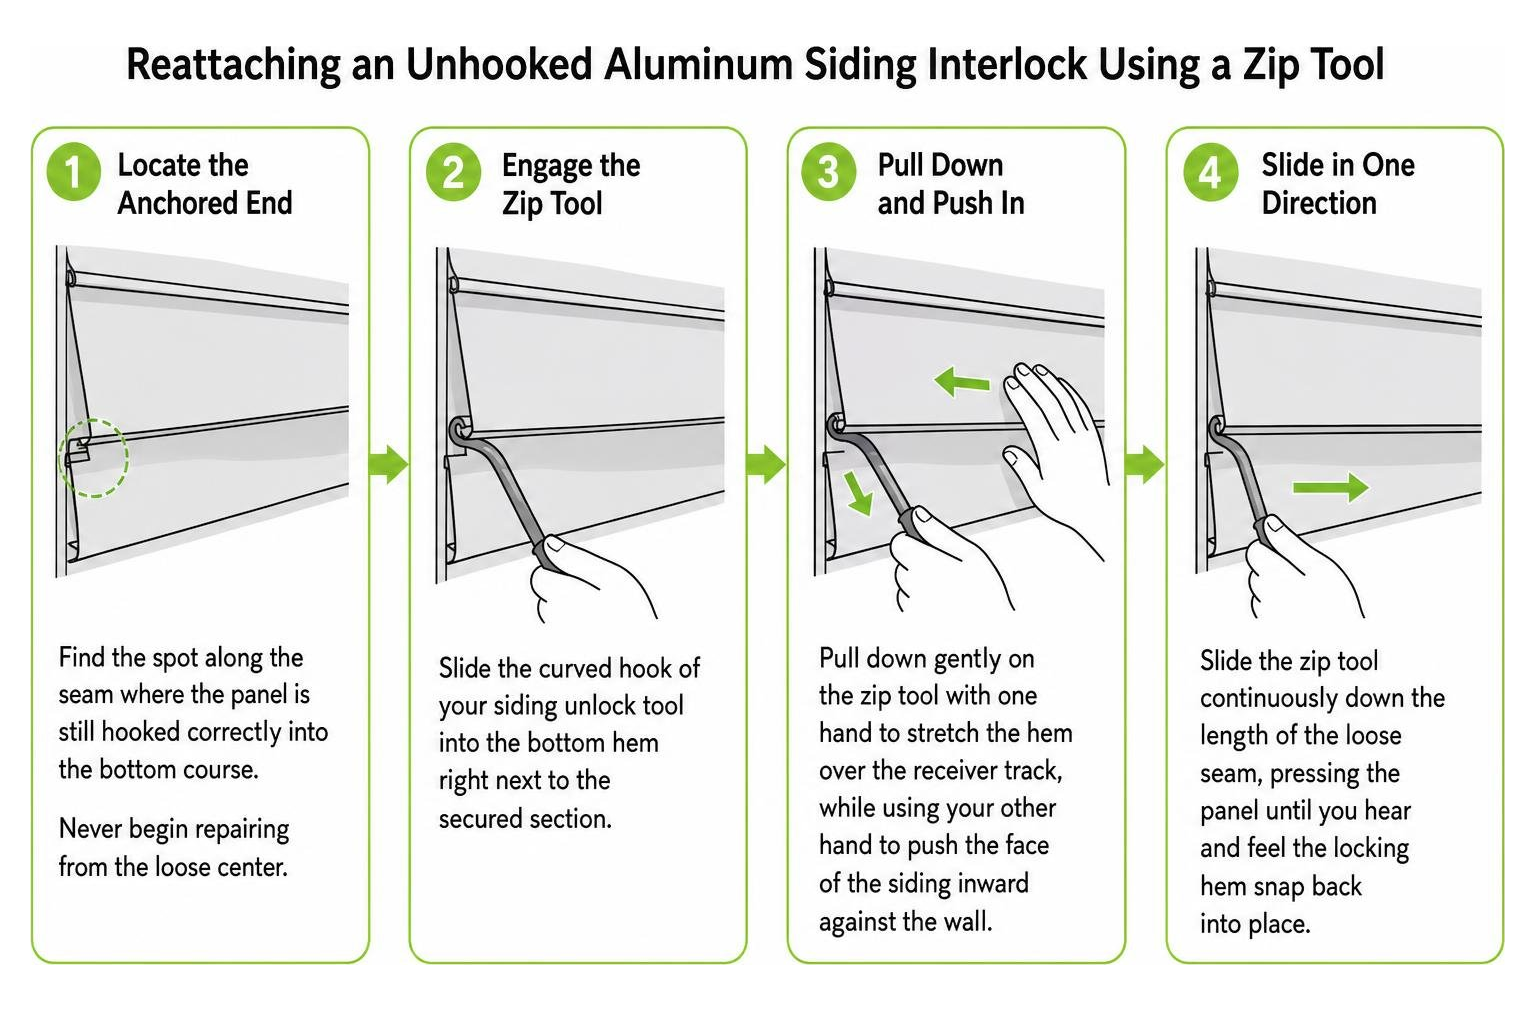
To snap loose panels back in place without damaging the metal:
- Locate the Anchored End: Find the spot along the seam where the panel is still hooked correctly into the bottom course. Never begin repairing from the loose center, as working inward from both sides creates metal buckles in the middle.
- Engage the Zip Tool: Slide the curved hook of your siding unlock tool into the bottom hem right next to the secured section.
- Pull Down and Push In: Pull down gently on the zip tool with one hand to stretch the hem over the receiver track, while using your other hand to push the face of the siding inward against the wall.
- Slide in One Direction: Slide the zip tool continuously down the length of the loose seam, pressing the panel until you hear and feel the locking hem snap back into place.
- Secure Backed-Out Nails: If the panel bowed because fasteners pulled free from the wall, place a flat scrap block of 2x4 wood lengthwise against the bottom lap of the siding. Gently tap the wood block with a hammer to press the loose nails back into the sheathing without denting the aluminum face.
- Apply Stabilizing Sealant: In areas prone to high winds, lift the bottom lip slightly before locking and place small dabs of clear exterior silicone near fastener locations along the track for added grip.
Full Panel Replacement Step-by-Step
When an aluminum plank is crushed or extensively damaged, replacing the entire piece is the cleanest, most durable solution.
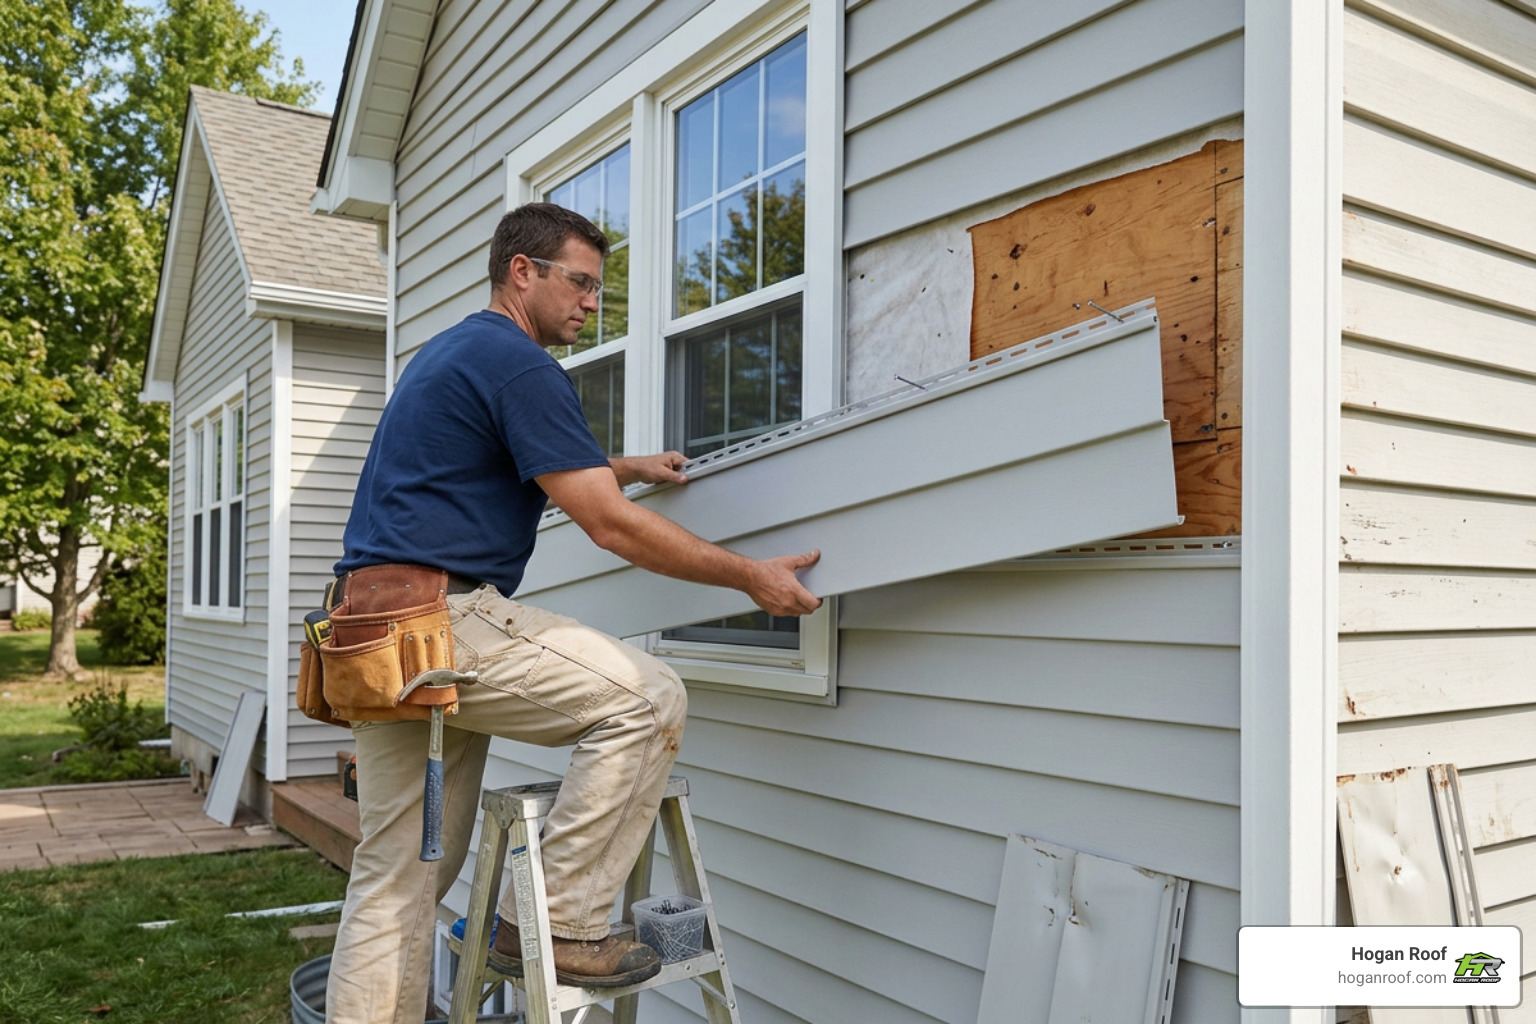
- Disengage the Course Above: Insert your zip tool under the bottom hem of the panel directly above the damaged piece. Slide the tool along the seam to unhook it and expose the nailing flange of the damaged panel beneath.
- Remove the Fasteners: Carefully slide a flat pry bar behind the nailing flange of the damaged panel. Place a small wooden shim under your pry bar to protect lower panels from denting, then pry out the roofing nails. If you encounter stubborn ring-shank or twist nails that refuse to budge, drive them completely flush into the wall framing or cut their heads off with an oscillating tool rather than tearing through surrounding metal.
- Inspect Sub-Wall Elements: Inspect the underlying weather-resistant barrier. Seal any tears or nail holes in the house wrap using specialized house wrap flashing tape.
- Measure and Cut the New Panel: Measure the replacement panel carefully. Aluminum panels have distinct directional laps; ensure your horizontal joints overlap by 6 to 8 inches to effectively shed water away from prevailing winds.
- Lock and Fasten the Replacement: Slide the top of the new panel into place, engaging its bottom hem onto the locking track of the course below. Push upward until the lower interlock fully seats.
- Leave Thermal Expansion Clearance: Drive 6d galvanized roofing nails through the center of the pre-punched nailing slots. Crucial rule: Do not nail the aluminum tightly against the wall. Leave approximately an 1/8-inch gap between the nail head and the siding flange so the metal can expand and contract in summer and winter without buckling.
- Re-lock the Upper Course: Use your zip tool to pull the bottom hem of the upper panel back down over the top flange of your new replacement piece until the entire wall is locked tight.
When to Choose DIY vs Professional Exterior Solutions
While simple patching and snap-lock fixes are well within reach for handy homeowners, some exterior problems point to deeper issues. Knowing when to handle a repair yourself and when to call a professional can save you thousands of dollars in avoidable damage.
Fixing minor surface issues on ground-level siding is an economical weekend project. Aluminum siding repairs generally run between $300 and $900 per 100 square feet for professional labor and materials, whereas basic DIY patches cost as little as $20 to $75 in supplies.
Working from high ladders with rigid, 12-foot metal panels is dangerous. If your damaged siding is on a second story, spans multiple stories, or touches complex roof-to-wall interfaces, exploring professional exterior services keeps you safe on the ground while ensuring the building envelope is weather-tight.
When Fixing Aluminum Siding Requires Professional Support
Certain structural red flags demand a professional inspection:
- Soft Sheathing & Sub-Wall Rot: If you press against a siding panel and feel spongy framing underneath, water has bypassed the cladding. The siding must be removed across that section to replace rotted plywood and repair compromised building paper.
- Roof-Line Intersections: Siding issues often stem from roof run-off issues where step flashing or kick-out flashing failed. Addressing these intersections involves both wall cladding and residential roofing expertise to keep water from getting behind the wall.
- Widespread Storm Claims: Following severe wind or hail storms, home insurance policies often cover whole-wall or full-elevation replacements. A licensed contractor can provide detailed damage assessments and work directly with insurance adjusters to restore your home.
Best Practices to Prevent Future Siding Damage
A few simple preventative habits will keep your aluminum siding looking great for decades:
- Maintain Landscape Clearances: Trim all bushes, tree limbs, and shrubs so they remain at least 12 inches away from exterior siding. Wind-blown branches will scratch through protective coatings in a single afternoon.
- Manage Gutter Runoff: Keep gutters clear of leaves and debris. Overflowing gutters spill dirty water directly down exterior siding seams, eroding paint and saturating corner posts.
- Redirect Lawn Sprinklers: Prevent sprinkler heads from spraying directly against your siding. Minerals in tap and well water cause heavy staining and oxidation over time.
- Schedule Bi-Annual Inspections: Walk around your property each spring and fall. Look for loosened panels, cracked caulking around window frames, and backed-out nails before minor issues turn into major water leaks.
- Wash with Low Pressure: Clean aluminum once or twice a year using a soft-bristle brush, mild exterior detergent, and a standard garden hose. Avoid high-pressure power washing angled upward, which can force gallons of water directly behind interlocking panel seams.
Frequently Asked Questions About Siding Repairs
How do I reattach loose aluminum siding without taking down a large section?
You can reattach an unhooked panel by using a specialized siding unlock (zip) tool. Hook the tool into the bottom hem near an area that is still anchored, pull gently downward while pressing the panel against the wall, and slide the tool along the loose track in a single direction. If fasteners have backed out, place a flat wooden block over the lap and tap it gently with a hammer to reseat the nails without denting the aluminum face.
Can you patch a hole in aluminum siding without replacing the entire plank?
Yes. For holes smaller than two to three inches, cut a matching aluminum patch that extends at least two inches past the damage on all sides. Trim away the nailing hem so the patch sits flat, apply a bead of exterior butyl caulk around the back perimeter, press it firmly over the opening, and paint the repair with an exterior acrylic latex paint to match your wall.
Why is aluminum siding more challenging to repair than vinyl siding?
Aluminum is a rigid material with zero elasticity. While vinyl can flex, bend, and snap back into place during repairs, aluminum will permanently crease or buckle if forced. Additionally, older aluminum siding builds up an oxidized surface coating over time, making paint and texture matching more involved than replacing a standard vinyl plank.
Conclusion
Your home’s siding is its first line of defense against driving rain, high winds, and harsh winter freezes. Whether you are popping out a small lawnmower dent with auto body filler or snapping a wind-blown panel back into its track, fixing aluminum siding as soon as damage appears protects your home's structural framing and preserves its curb appeal.
When exterior damage spans multiple stories, hides rotted sheathing underneath, or requires a full exterior evaluation, our team at Hogan Roof is ready to help. With over 20 years of trusted service across the NY, NJ, and CT tri-state area, we deliver lasting exterior solutions backed by industry-leading craftsmanship. Contact us today to schedule your complimentary inspection, or explore our full suite of replacement options for your exterior walls on our Siding service page.