Ditch the Wood and Switch to Stucco Like a Pro
Changing Wood Siding to Stucco: Start With the Wall Beneath
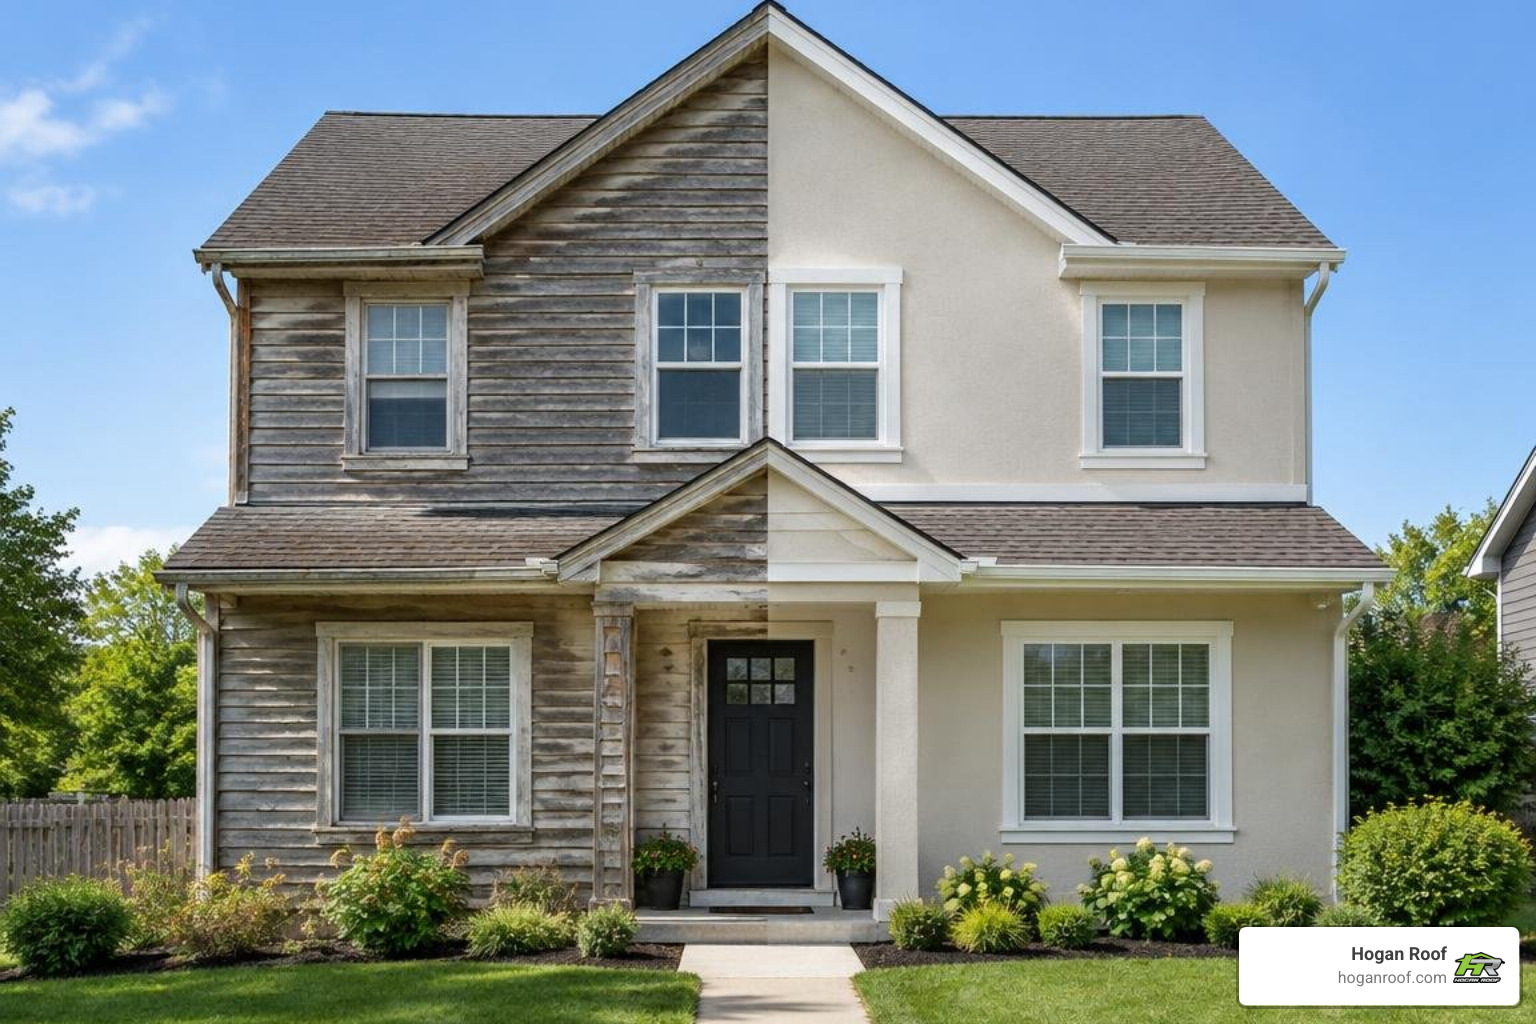
To replace wood siding with stucco, start by checking the wood and framing for rot or water damage . If the siding is sound and suitable, a contractor may be able to build a stucco system over it. If it is damaged or too uneven, remove it first. Either way, the new wall needs a weather-resistant barrier, flashing, drainage details, lath, and properly cured stucco coats. Never apply stucco directly to bare wood.
The choice between an overlay and a tear-off affects cost, moisture risk, and how well the finished wall holds up. This guide will help you know what to inspect and what to ask before work begins.
I'm Bill Hogan, owner of Hogan Roof, with more than 20 years of experience in roofing and siding across NY, NJ, and CT. When homeowners ask about changing wood siding to stucco, I focus first on the condition of the wall and its ability to keep water out.
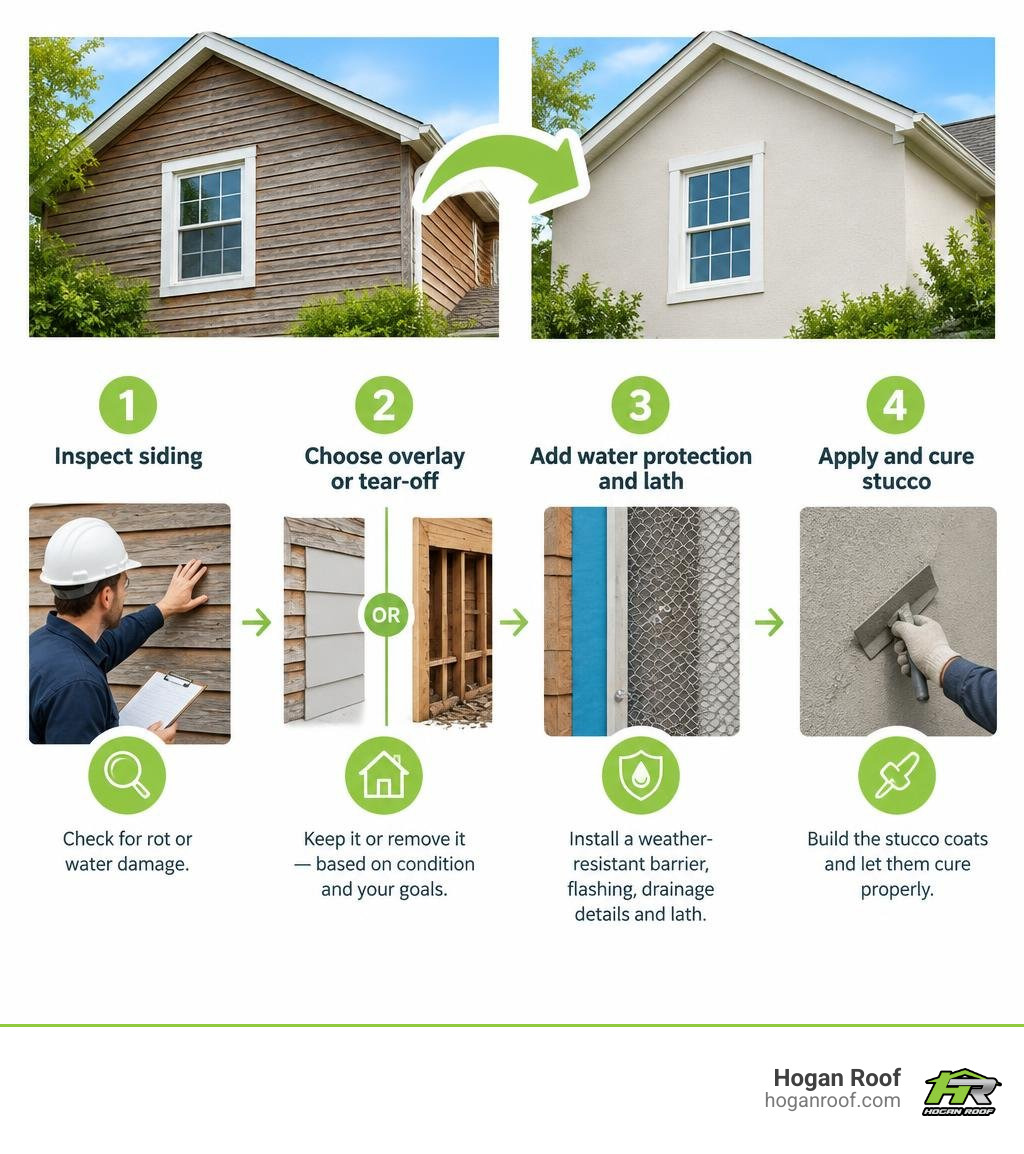
Changing wood siding to stucco terms made easy:
Critical Considerations When Changing Wood Siding to Stucco
Swapping timber boards for a classic, continuous masonry finish transforms your home's exterior aesthetic, boosts fire defense, and eliminates repetitive scraping and repainting cycles. However, transitioning between two fundamentally different materials demands serious planning. Wood expands, contracts, and breathes; Portland-cement-based stucco is a rigid, heavy cladding that must never be applied directly to untreated lumber.
Before making any purchases, you must decide whether to pursue a full tear-off down to the wall studs or install a stucco overlay on top of existing boards. Both methods require securing appropriate building permits and having structural load capacity evaluated by a professional. Stucco adds significant dead weight to a structure—often between 8 and 12 pounds per square foot for a classic 3/8-inch scratch and brown assembly. Older framing must be assessed to ensure it can bear this increased load without sagging or racking.
A full tear-off offers an ideal opportunity to review our comprehensive house siding replacement guide to understand how your overall structural envelope behaves when stripped down to the studs.
Evaluating Existing Wood Siding and Framing Damage
A stucco assembly is only as dependable as the substrate supporting it. If you choose an overlay, the existing wood boards become the foundational backing for your metal lath and mortar coats.
Inspect your current siding for the following hidden issues:
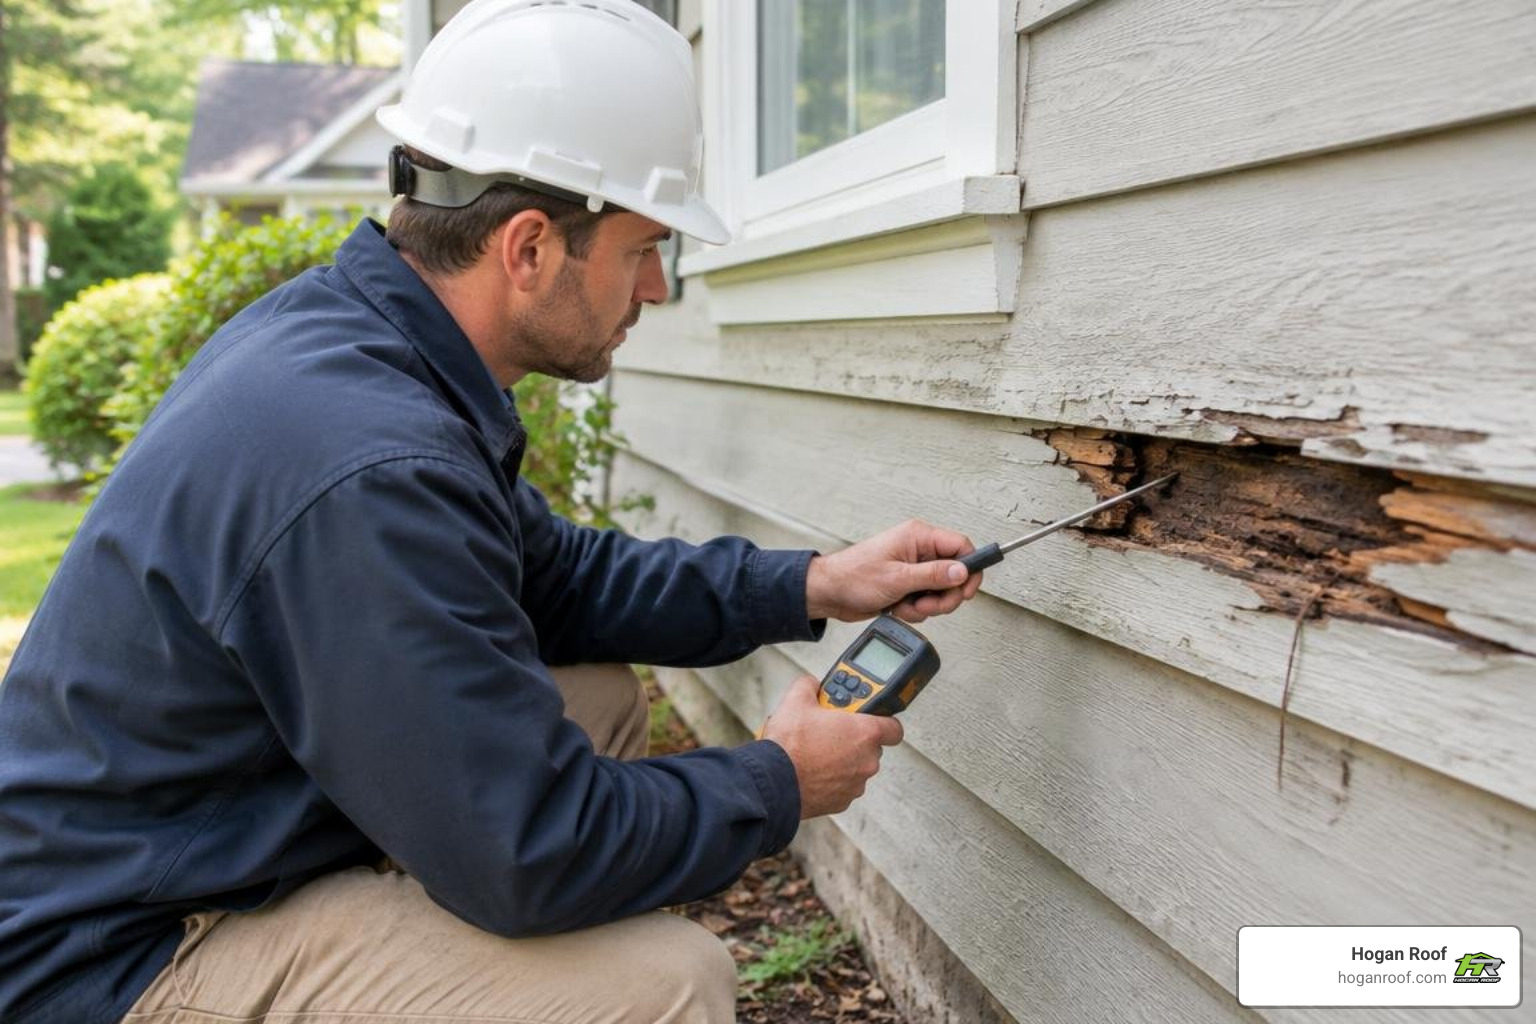
- Substrate rot and soft spots: Probe lower wall sections, water tables, and areas beneath window sills with an awl. Rotted wood will decay further beneath wet cement, eventually causing the stucco to delaminate and crack.
- Mold and fungal growth: Blackened wood or active fungal spore development indicates recurring moisture intrusion that must be resolved at the flashing level.
- Siding profiles: Flat sheet profiles like T1-11 plywood, flat panel plywood, ship-lap, and channel rustic siding can sometimes remain in place if they are structurally intact and plumb. By contrast, beveled or overlapping horizontal clapboards create hollow air pockets behind the lath that compromise mechanical fastening, requiring either removal or the addition of vertical furring strips to establish a flat plane.
- Sheathing and framing integrity: If the structural sheathing beneath the siding shows signs of water damage, pest infestation, or structural deflection, a full tear-off is mandatory.
Cost Comparison: Stucco Overlay vs. Complete Tear-Off
When planning your budget, balance upfront demolition savings against long-term risk management. Stucco installation typically costs between $6 and $9 per square foot, with rates reaching $10 per square foot in certain markets. For a 2,000-square-foot home, standard installation costs can fall under $10,000, while a larger 5,000-square-foot exterior may run between $15,000 and $30,000.
A complete tear-off increases upfront labor and dumpster disposal costs, but it uncovers hidden framing damage before it can ruin your investment. You can review transparent exterior pricing details to evaluate how these variables balance across different project scopes.
| Project Factor | Stucco Overlay (Over Sound Wood) | Complete Tear-Off & Stucco Installation |
|---|---|---|
| Average Cost per Sq. Ft. | $6 – $9 | $9 – $14+ (Includes demo & new sheathing) |
| Typical Total (2,000 sq ft) | $8,000 – $14,000 | $15,000 – $24,000 |
| Demolition & Disposal Fees | Minimal to None | $1,500 – $4,000 |
| Risk of Hidden Framing Decay | Moderate to High (Cannot inspect studs) | Zero (Full visual inspection of envelope) |
| Wall Thickness Adjustments | Significant (Requires jamb extensions) | Minimal (Maintains original wall depth) |
| Structural Longevity | 30 to 50 Years (Dependent on old wood) | 50 to 100+ Years (Built from base sheathing) |
Moisture Management, Climate Factors, and Wall Defense
Stucco functions as a "reservoir cladding." This means Portland cement absorbs rainwater like a hard sponge during storms and releases it through evaporation once the sun emerges. Because stucco holds moisture, your underlying wood framing must be shielded with an unbroken weather-resistive barrier (WRB).
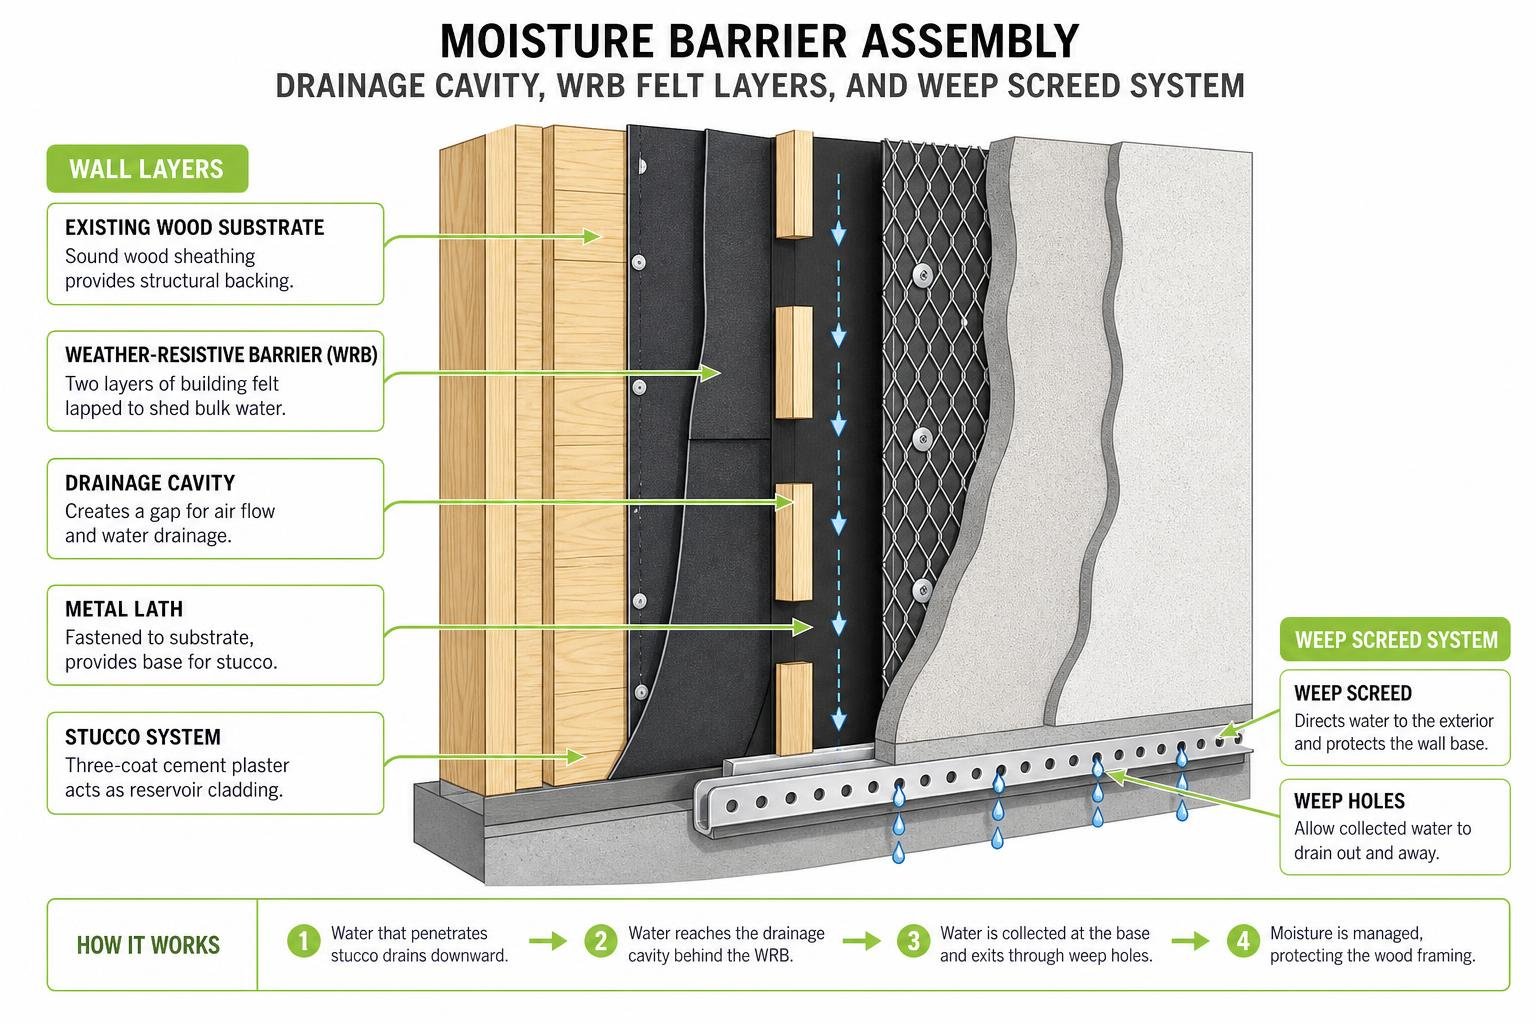
Without a dedicated drainage cavity and water-shedding barrier, moisture trapped against wood causes rapid framing rot, ruined insulation, and interior black mold.
Drainage Cavities, Weep Screeds, and Flashing Details
Modern building codes require a continuous drainage plane between reservoir claddings and wood substrates. To protect the wall assembly:
- Weather-Resistive Barriers (WRB): Apply two layers of Grade D asphalt-saturated kraft building paper or an equivalent water-resistive membrane over the wood base. The dual layers allow water that penetrates the stucco to run down between the paper sheets rather than soaking the structural sheathing.
- Weep Screeds: Install a perforated galvanized steel weep screed along the bottom perimeter of the exterior wall, placed at least 4 inches above earth or 2 inches above paved surfaces. This gives absorbed moisture an open exit path out of the wall base.
- Flashing and Openings: Windows and exterior doors must be integrated with self-adhering flashing tape and corrosion-resistant metal head flashings. Because adding lath and stucco builds out wall depth by an inch or more, window and door frames often require jamb extensions to maintain proper drainage lines.
If you are exploring alternatives to masonry, reviewing Long Island siding company services or learning how repairing aluminum siding compares can help clarify how different claddings manage water.
The Complete Technical Installation and Curing Guide
Installing a three-coat stucco system over a wood substrate requires precise craftsmanship, accurate mix ratios, and strict adherence to mandatory curing schedules.
Step-by-Step Process for Changing Wood Siding to Stucco
- Substrate Preparation: Inspect and secure every piece of existing wood siding with galvanized nails. If the siding is bevel-lapped, install vertical furring strips to establish a flat mounting plane.
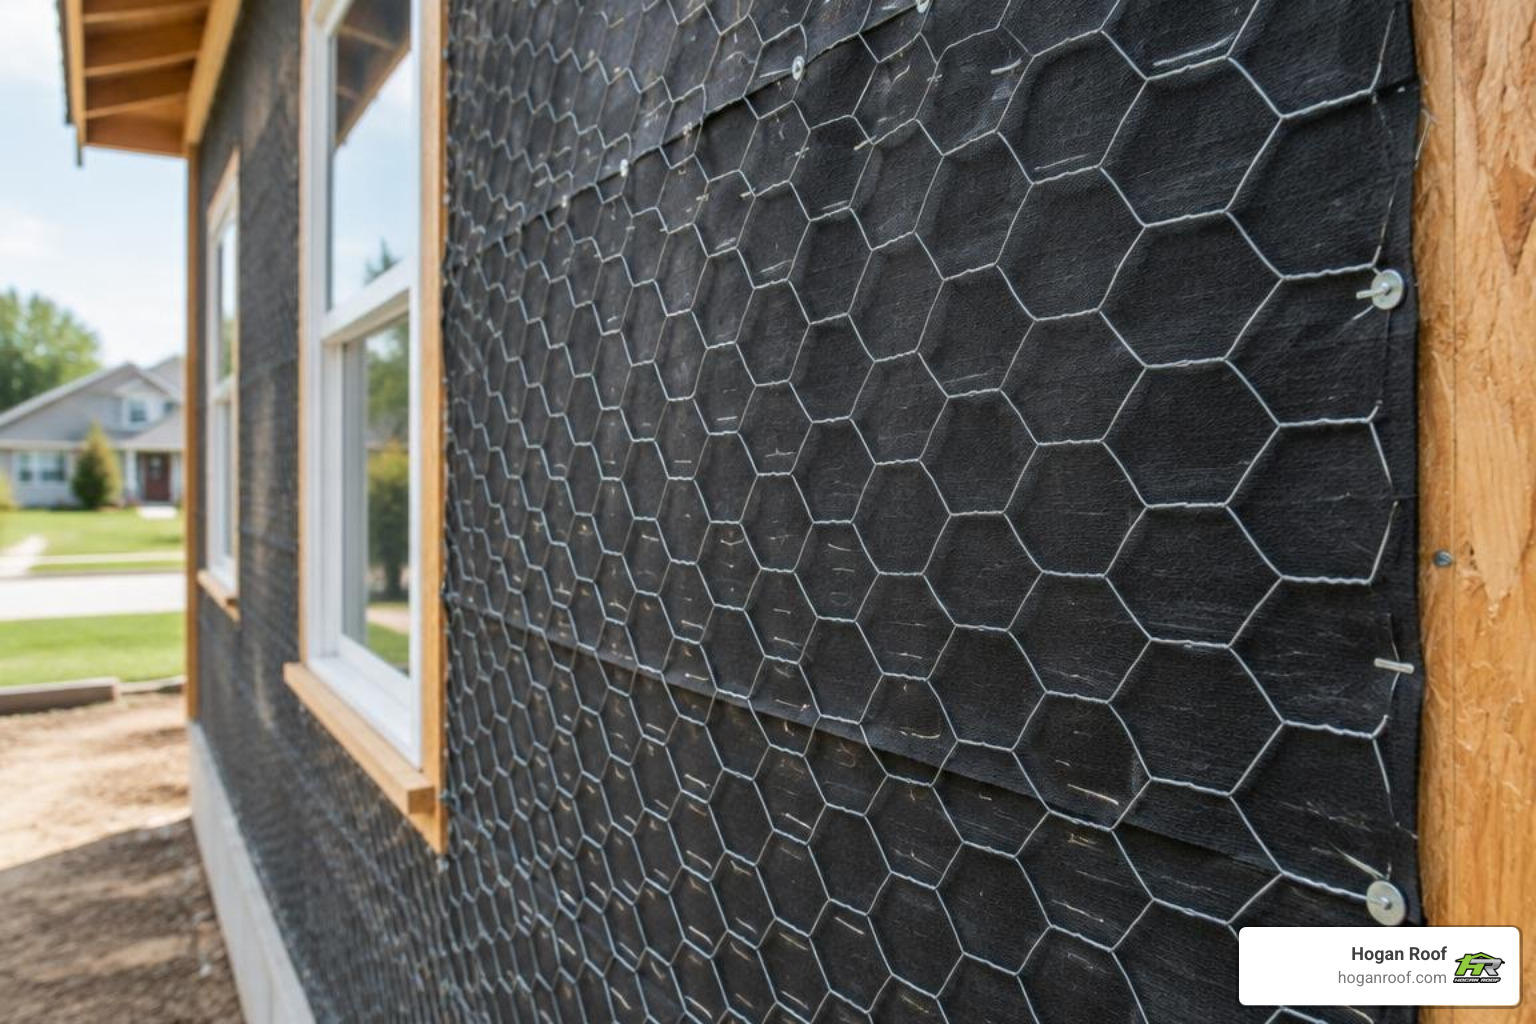
- WRB and Flashing Installation: Apply two layers of Grade D building paper or code-approved synthetic house wrap horizontally, overlapping upper sheets over lower sheets by at least 3 inches, with 6-inch vertical laps.
- Casing Beads and Weep Screed: Fasten galvanized casing beads around window and door perimeters, and mount the foundation weep screed level along the bottom edge of the framing.
- Lath Application: Attach 2.5 lb/yd² or 3.4 lb/yd² self-furring galvanized diamond mesh metal wire lath over the barrier using corrosion-resistant furring nails or heavy staples driven directly into the wall studs. The self-furring dimples hold the mesh 1/4-inch away from the wall, allowing mortar to embed the wire completely.
- Adjusting Utilities: Mount extension rings on exterior electrical boxes, outdoor hose bibs, light junction boxes, and HVAC lines to account for the increased wall thickness.
Three-Coat Application, Scratch Coat, and Curing Timelines
A traditional three-coat installation provides reliable impact resistance and strength across three separate mortar stages:
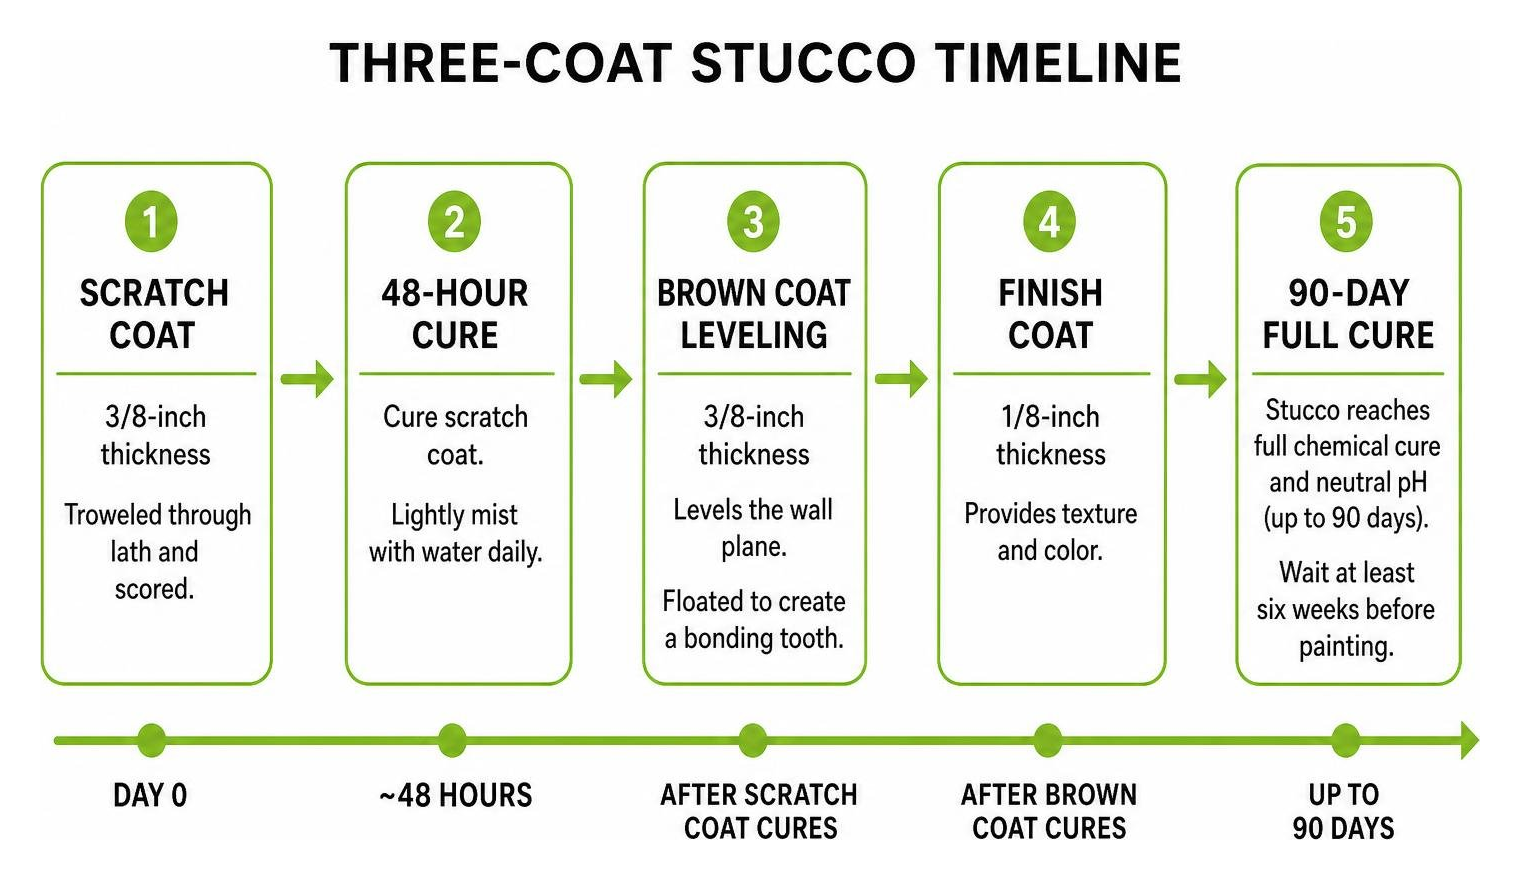
- The Scratch Coat (3/8-inch thickness): The base coat of Portland cement, sand, hydrated lime, and water is troweled firmly through the metal lath, fully embedding the wire. Before it hardens, score horizontal lines across the surface with a notched scarifier. Let the scratch coat cure for approximately 48 hours , lightly misting it with water daily to prevent shrinkage cracks.
- The Brown Coat (3/8-inch thickness): The brown coat levels out the wall plane. Applied over the dampened scratch coat, it is smoothed flat using a straightedge darby tool and floated to create a consistent, lightly textured tooth for mechanical bonding.
- The Finish Coat (1/8-inch thickness): Applied after the brown coat has cured and settled, the final coat delivers your chosen architectural texture and color. Pigments can be integrated directly into the cement mix or applied via an acrylic finish coat.
- Curing and Painting Windows: While the wall will feel solid within days, Portland cement stucco requires up to 90 days to reach full chemical cure and drop to a safe, neutral pH level. If you plan on applying an exterior elastomeric paint rather than an integrally colored finish, exterior specialists recommend waiting at least six weeks to prevent alkaline burn from ruining your paint adhesion.
Performance Upgrades: Fire Resistance, Efficiency, and Appraisal ROI
Upgrading to a dense masonry exterior delivers substantial functional benefits over traditional lumber cladding.
- Non-Combustible Fire Resistance: Stucco is a non-combustible exterior finish. In wildfire zones or densely populated suburban neighborhoods, a 7/8-inch three-coat stucco assembly offers a 1-hour fire rating, preventing airborne embers from igniting the exterior wall cavity.
- Acoustic and Thermal Insulation: The high density of cement adds thermal mass to your building envelope, dampening outdoor noise and moderating indoor temperature swings.
- Pest and Insect Defense: Termites, carpenter ants, and woodpeckers can destroy wood siding, but they cannot penetrate or feed on solid Portland cement.
Long-Term Value and ROI of Changing Wood Siding to Stucco
Upgrading an exterior pays off both in daily peace of mind and resale performance. A well-maintained stucco exterior can last 50 years to upwards of 100 years. Aside from occasional gentle garden-hose washdowns and inspecting caulk lines, ongoing maintenance costs remain minimal when natural earth tones are used.
From a real estate appraisal perspective, exterior remodels consistently recoup 60% to 70% of their upfront cost in added home equity. Upgrading to a seamless, fire-resistant exterior improves curb appeal, shortens time on market, and can lower homeowner insurance premiums in fire-prone regions.
To help manage exterior renovation costs, we offer flexible project financing options that fit structural upgrades into your monthly budget.
Common Mistakes to Avoid During Conversion
Avoid these frequent pitfalls during your conversion:
- Direct Application to Wood: Never smear wet mortar directly onto wood siding or plywood. The wood will pull moisture out of the wet mix, causing the cement to crumble while the wood underneath rots.
- Skipping Movement and Expansion Joints: Stucco expands and contracts with changes in temperature. Omitting vertical control joints on long wall runs guarantees random surface cracks.
- High-Pressure Power Washing: Blasting cured stucco with high-pressure washers erodes the aggregate finish and drives moisture deep into the wall assembly. Clean surfaces using low-pressure garden hoses and mild detergents.
- Failing to Lap the WRB Correctly: Reverse-lapping building felt (tucking higher sheets behind lower sheets) directs water straight into the wood framing. Always install building felt like roof shingles, lapping upper sheets over lower ones.
If you are exploring other low-maintenance, weather-tough materials, our guides on protecting your home with quality vinyl siding in Nassau County, NY, upgrading your exterior with the best vinyl siding in Nassau County or tips on how to choose the right vinyl siding in Suffolk County highlight great non-masonry choices.
Frequently Asked Questions About Siding Conversions
Can you apply stucco directly over old wood siding without removing it?
No. Stucco must never touch bare wood directly. However, you can install a stucco assembly over existing wood siding if the boards are flat (such as T1-11 or sound plywood), completely free of rot, and properly prepared with two layers of Grade D weather-resistive paper, weep screeds, and self-furring galvanized metal lath.
How long does it take for new stucco to cure before you can paint it?
The scratch coat cures in about 48 hours, while the brown coat requires several days of hydration. The entire system takes up to 90 days to achieve a complete chemical cure. If you choose to paint the exterior, wait at least six weeks (42 days) to allow surface alkalinity and moisture levels to stabilize, ensuring your paint will not blister or peel.
How much value does converting wood siding to stucco add to a home?
A professional stucco conversion generally returns 60% to 70% of the project's total cost in appraisal value. It boosts buyer appeal through a modern, upscale look, lowers exterior maintenance demands, improves thermal mass, and can lower fire insurance premiums.
Conclusion
Switching your home's exterior from dated wood siding to a continuous stucco system is an excellent way to elevate curb appeal, defend against fire hazards, and eliminate the repetitive upkeep of painting and scraping wood boards. The key to a successful conversion lies in proper substrate preparation, robust moisture barriers, correct lath attachment, and disciplined mortar curing.
At Hogan Roof, our team brings over 20 years of exterior construction experience across New York, New Jersey, and Connecticut. Whether you are planning a full masonry conversion or exploring our expert siding services, we make sure your building envelope stays dry, durable, and structurally sound for decades to come.
Ready to upgrade your home's exterior? Schedule a free exterior inspection with our team, or get a fast estimate online using our instant roof quote tool today!